Our first pandemic shed became a much needed workshop but didn’t really fulfill our need for secure storage. We both have ebikes now – practically essential in this very hilly town and also very fun – And then there is all the gardening equipment.
So as the pandemic dragged on and on, well it made sense to put time and energy to good use and rebuild the other dodgy shed that sits at driveway level. This one is in a much more felicitous location in that we had the materials dumped in the driveway by a big truck and all the work happened there.
We planned to build it together but my better half became obsessed and I just had to stay outta the way. Fortunately, I had my own big project on the go at the same time. So I was there at the beginning to excavate and build the wall, and then at the end where I played a big role in the priming painting and decorating. Otherwise, it was a one man job.
Here is the pictorial.
Step 1: excavate the embankment
Step 2: Build a retaining wall
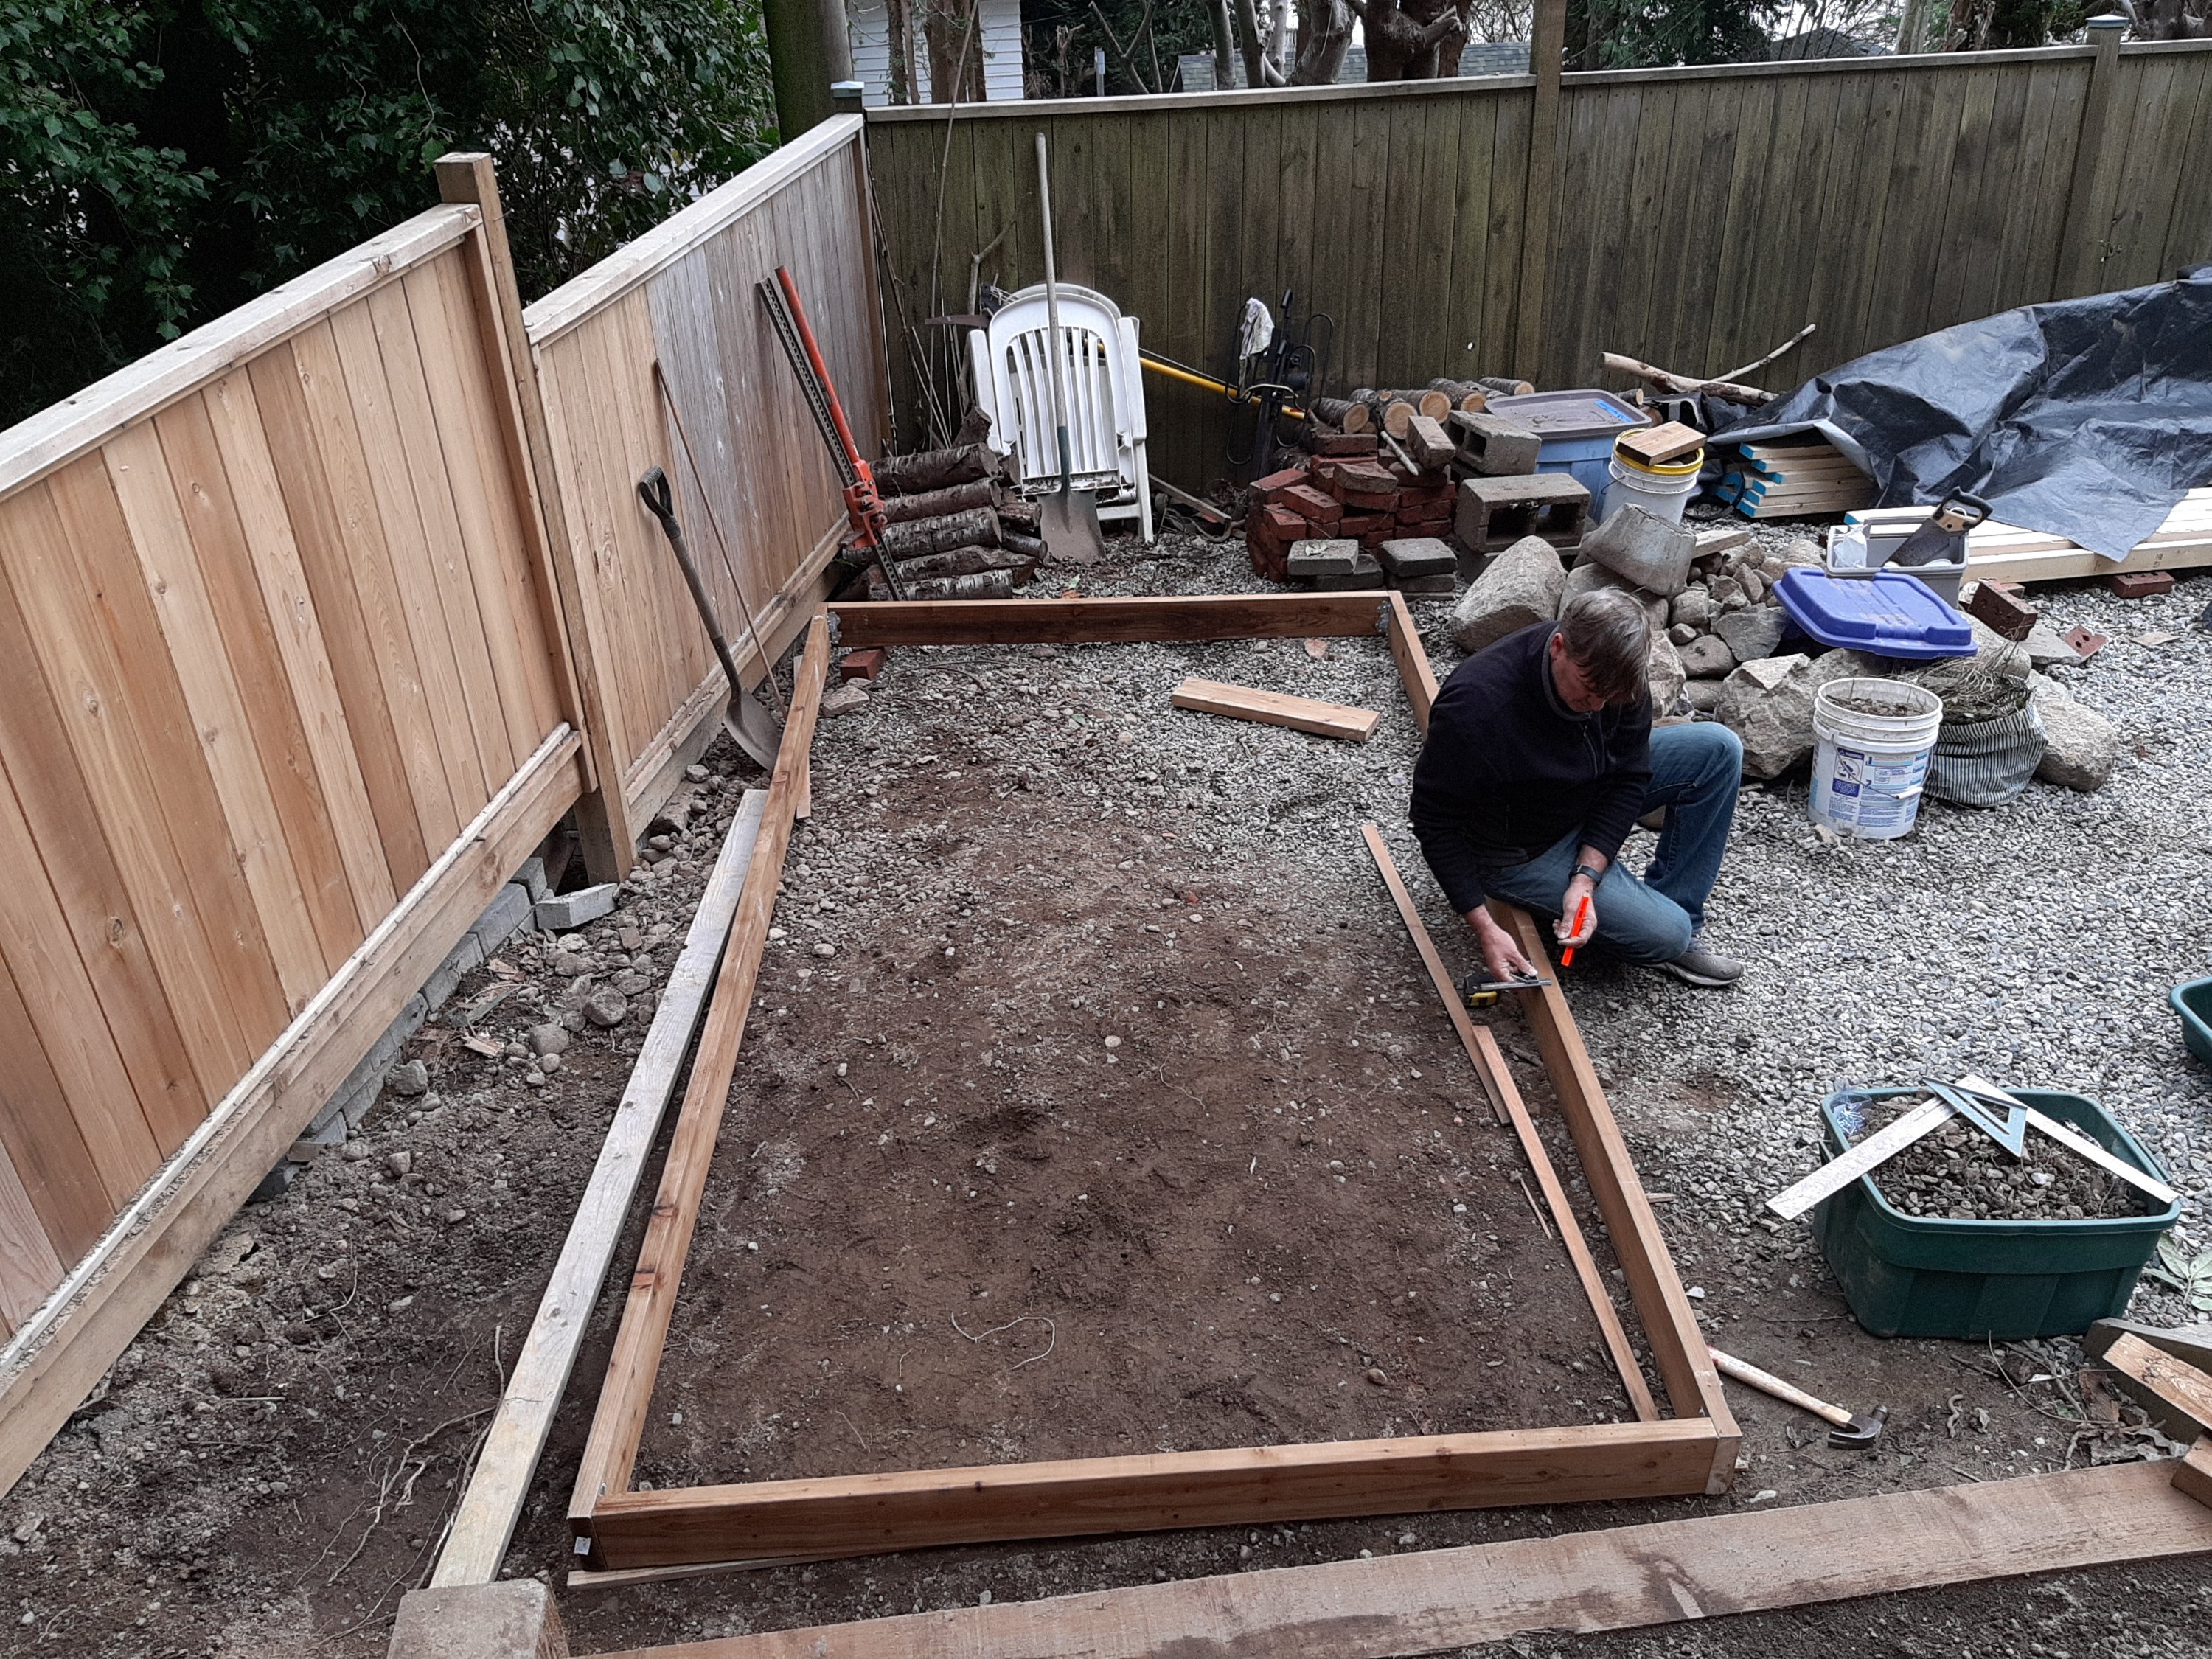
3: Lay out a perimeter
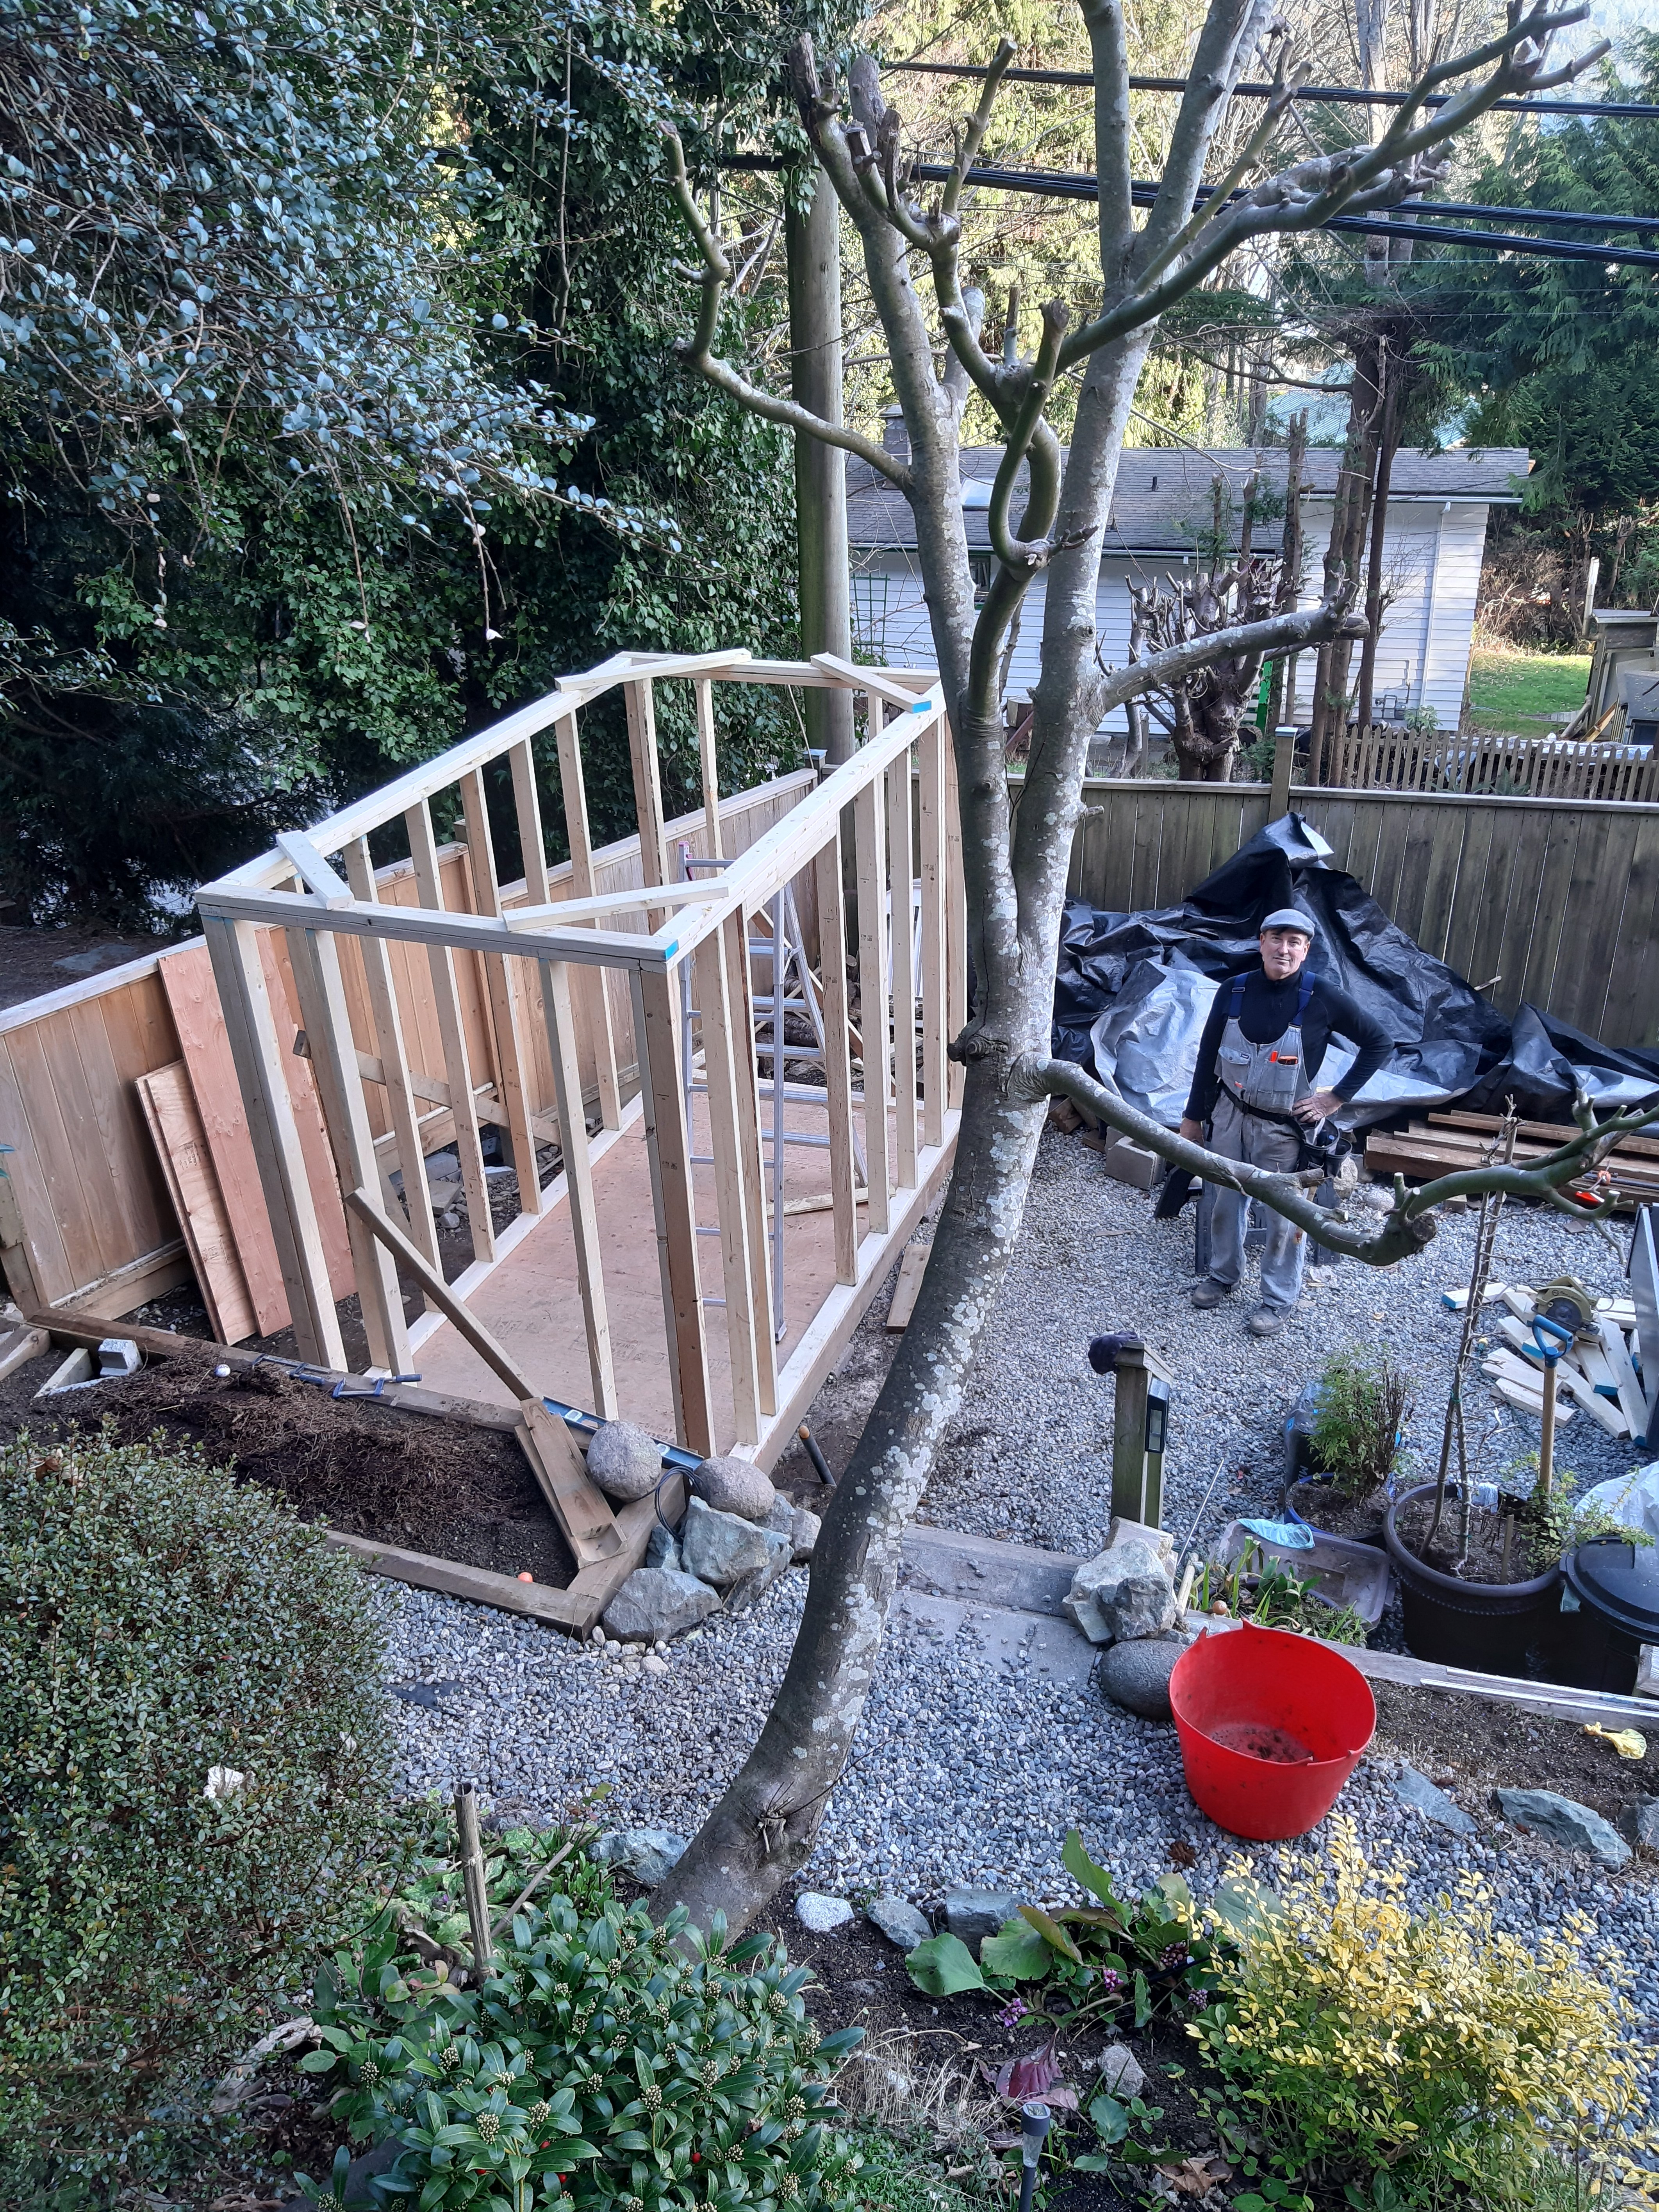
Then boom! Studs up.
Add rancher board
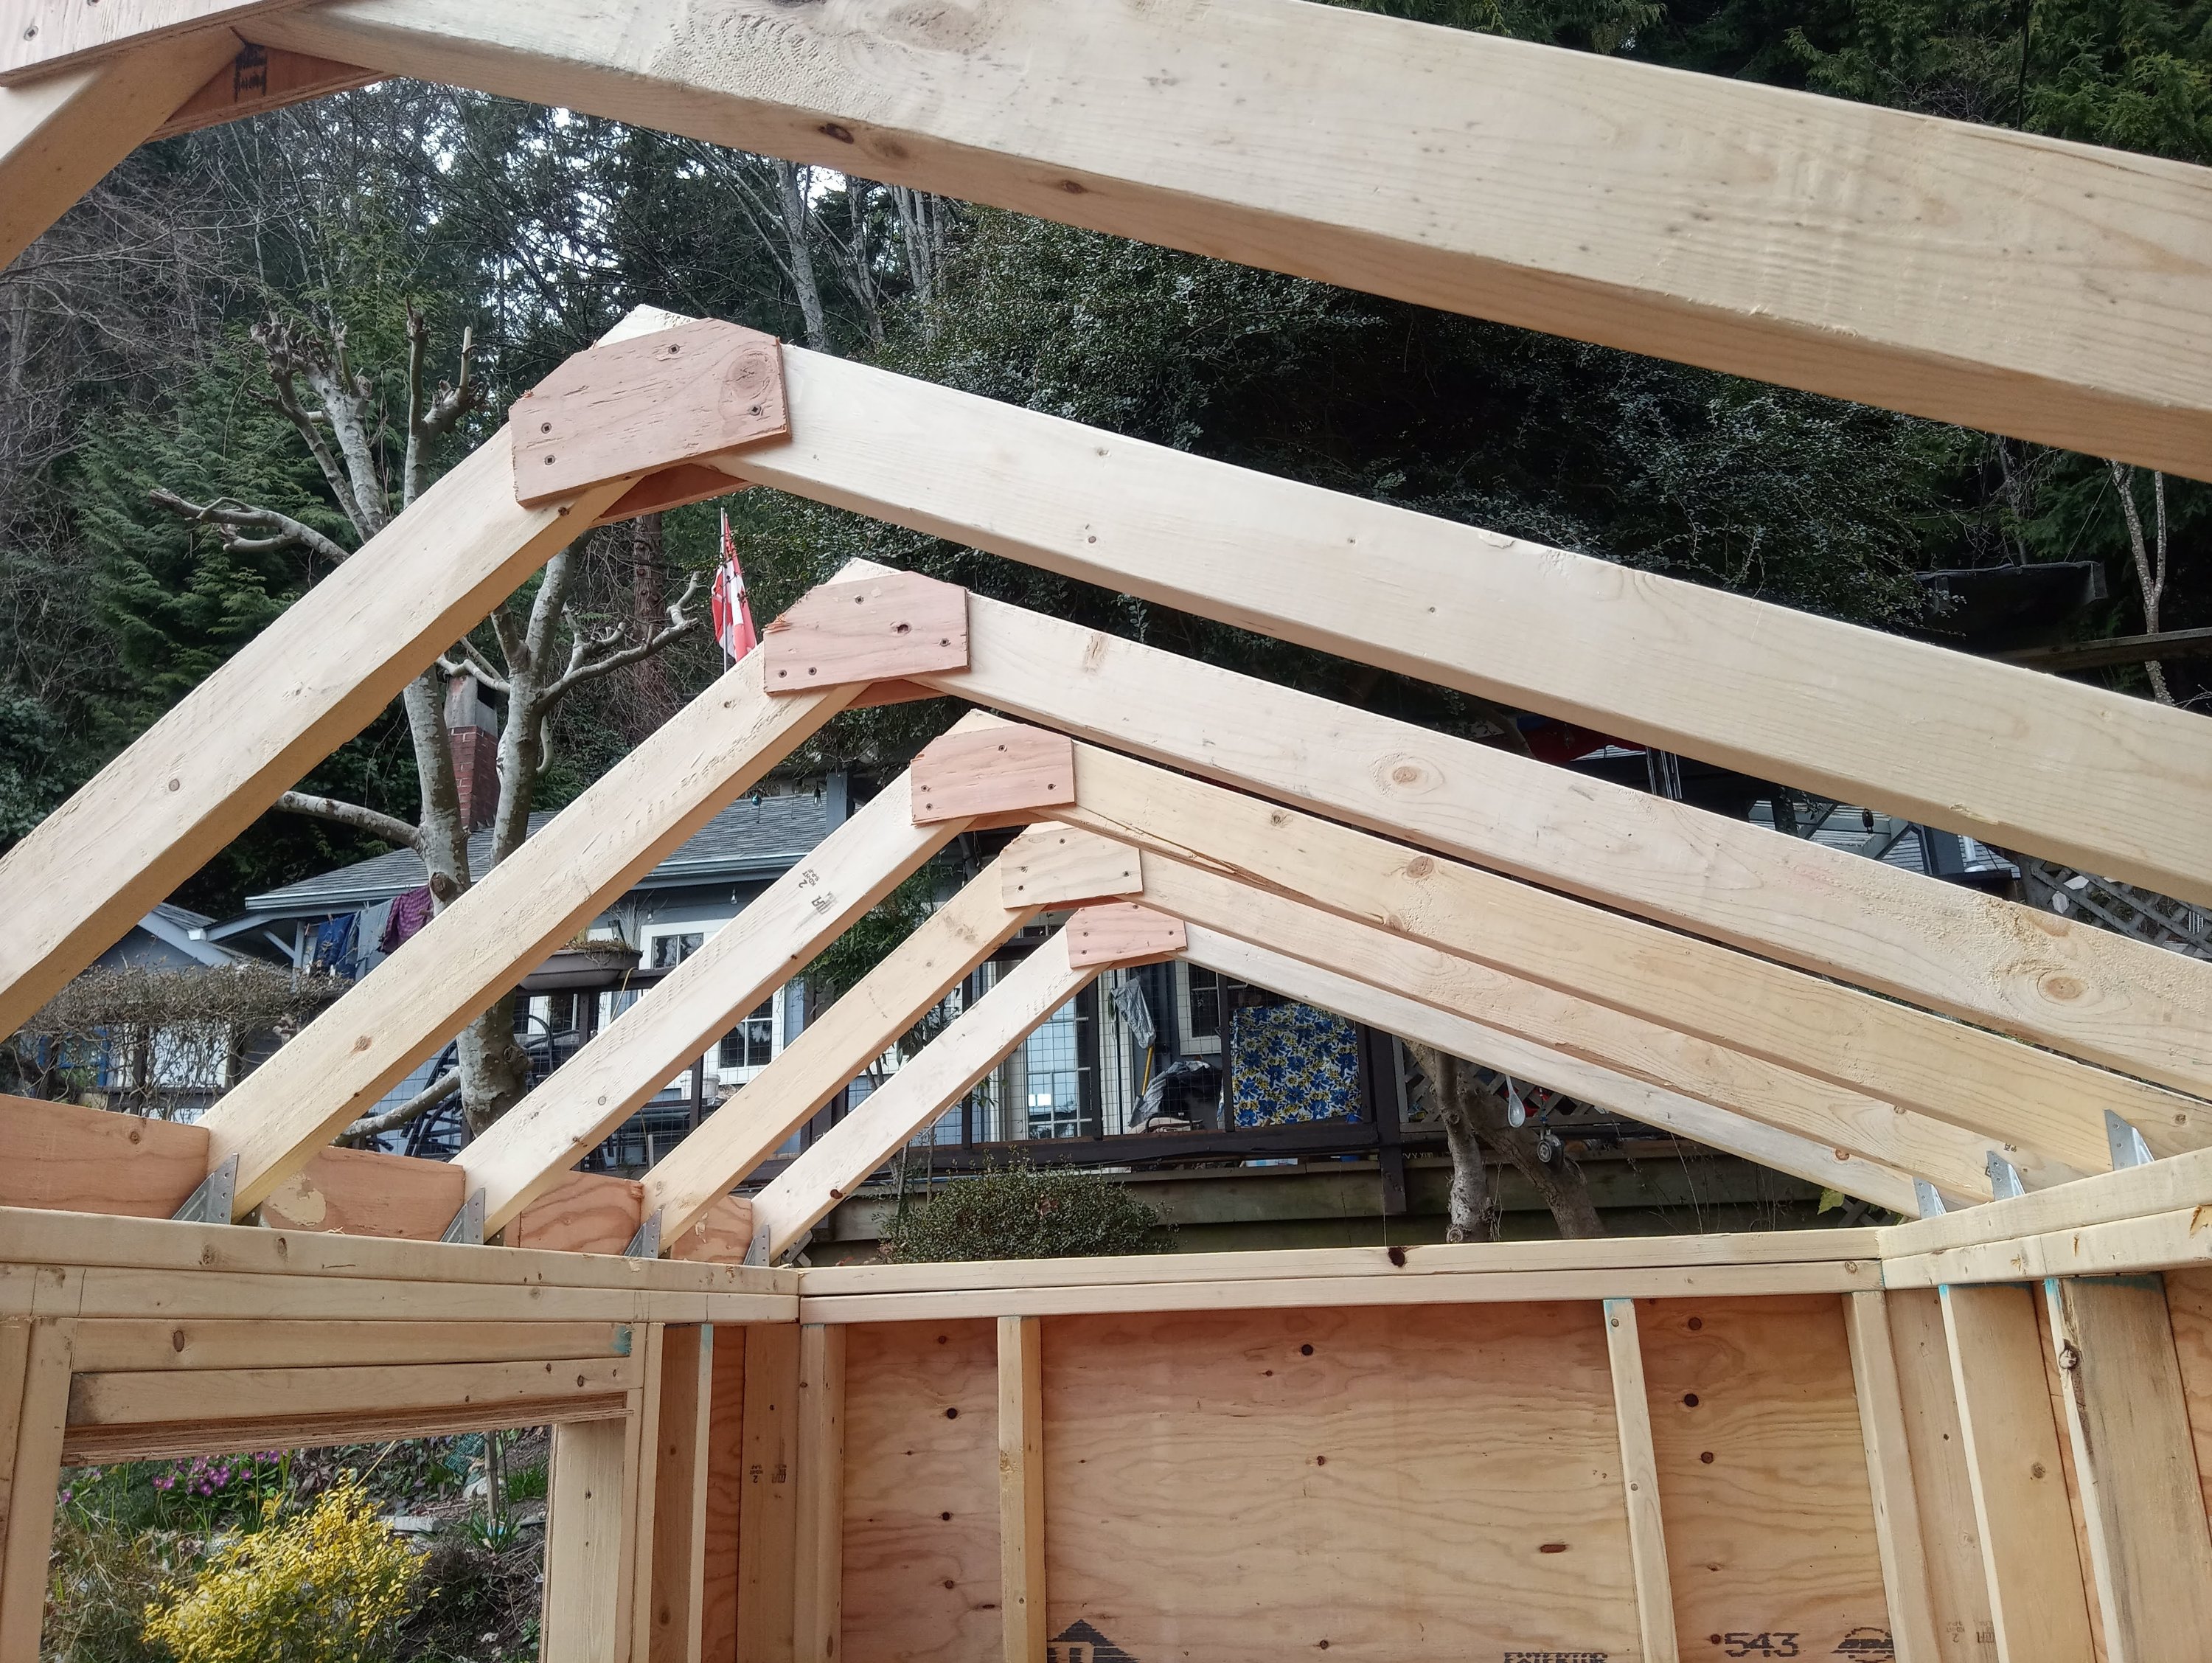
Build some trusses
1 door, 2 windows plywood and some tarpaper
Shingles on
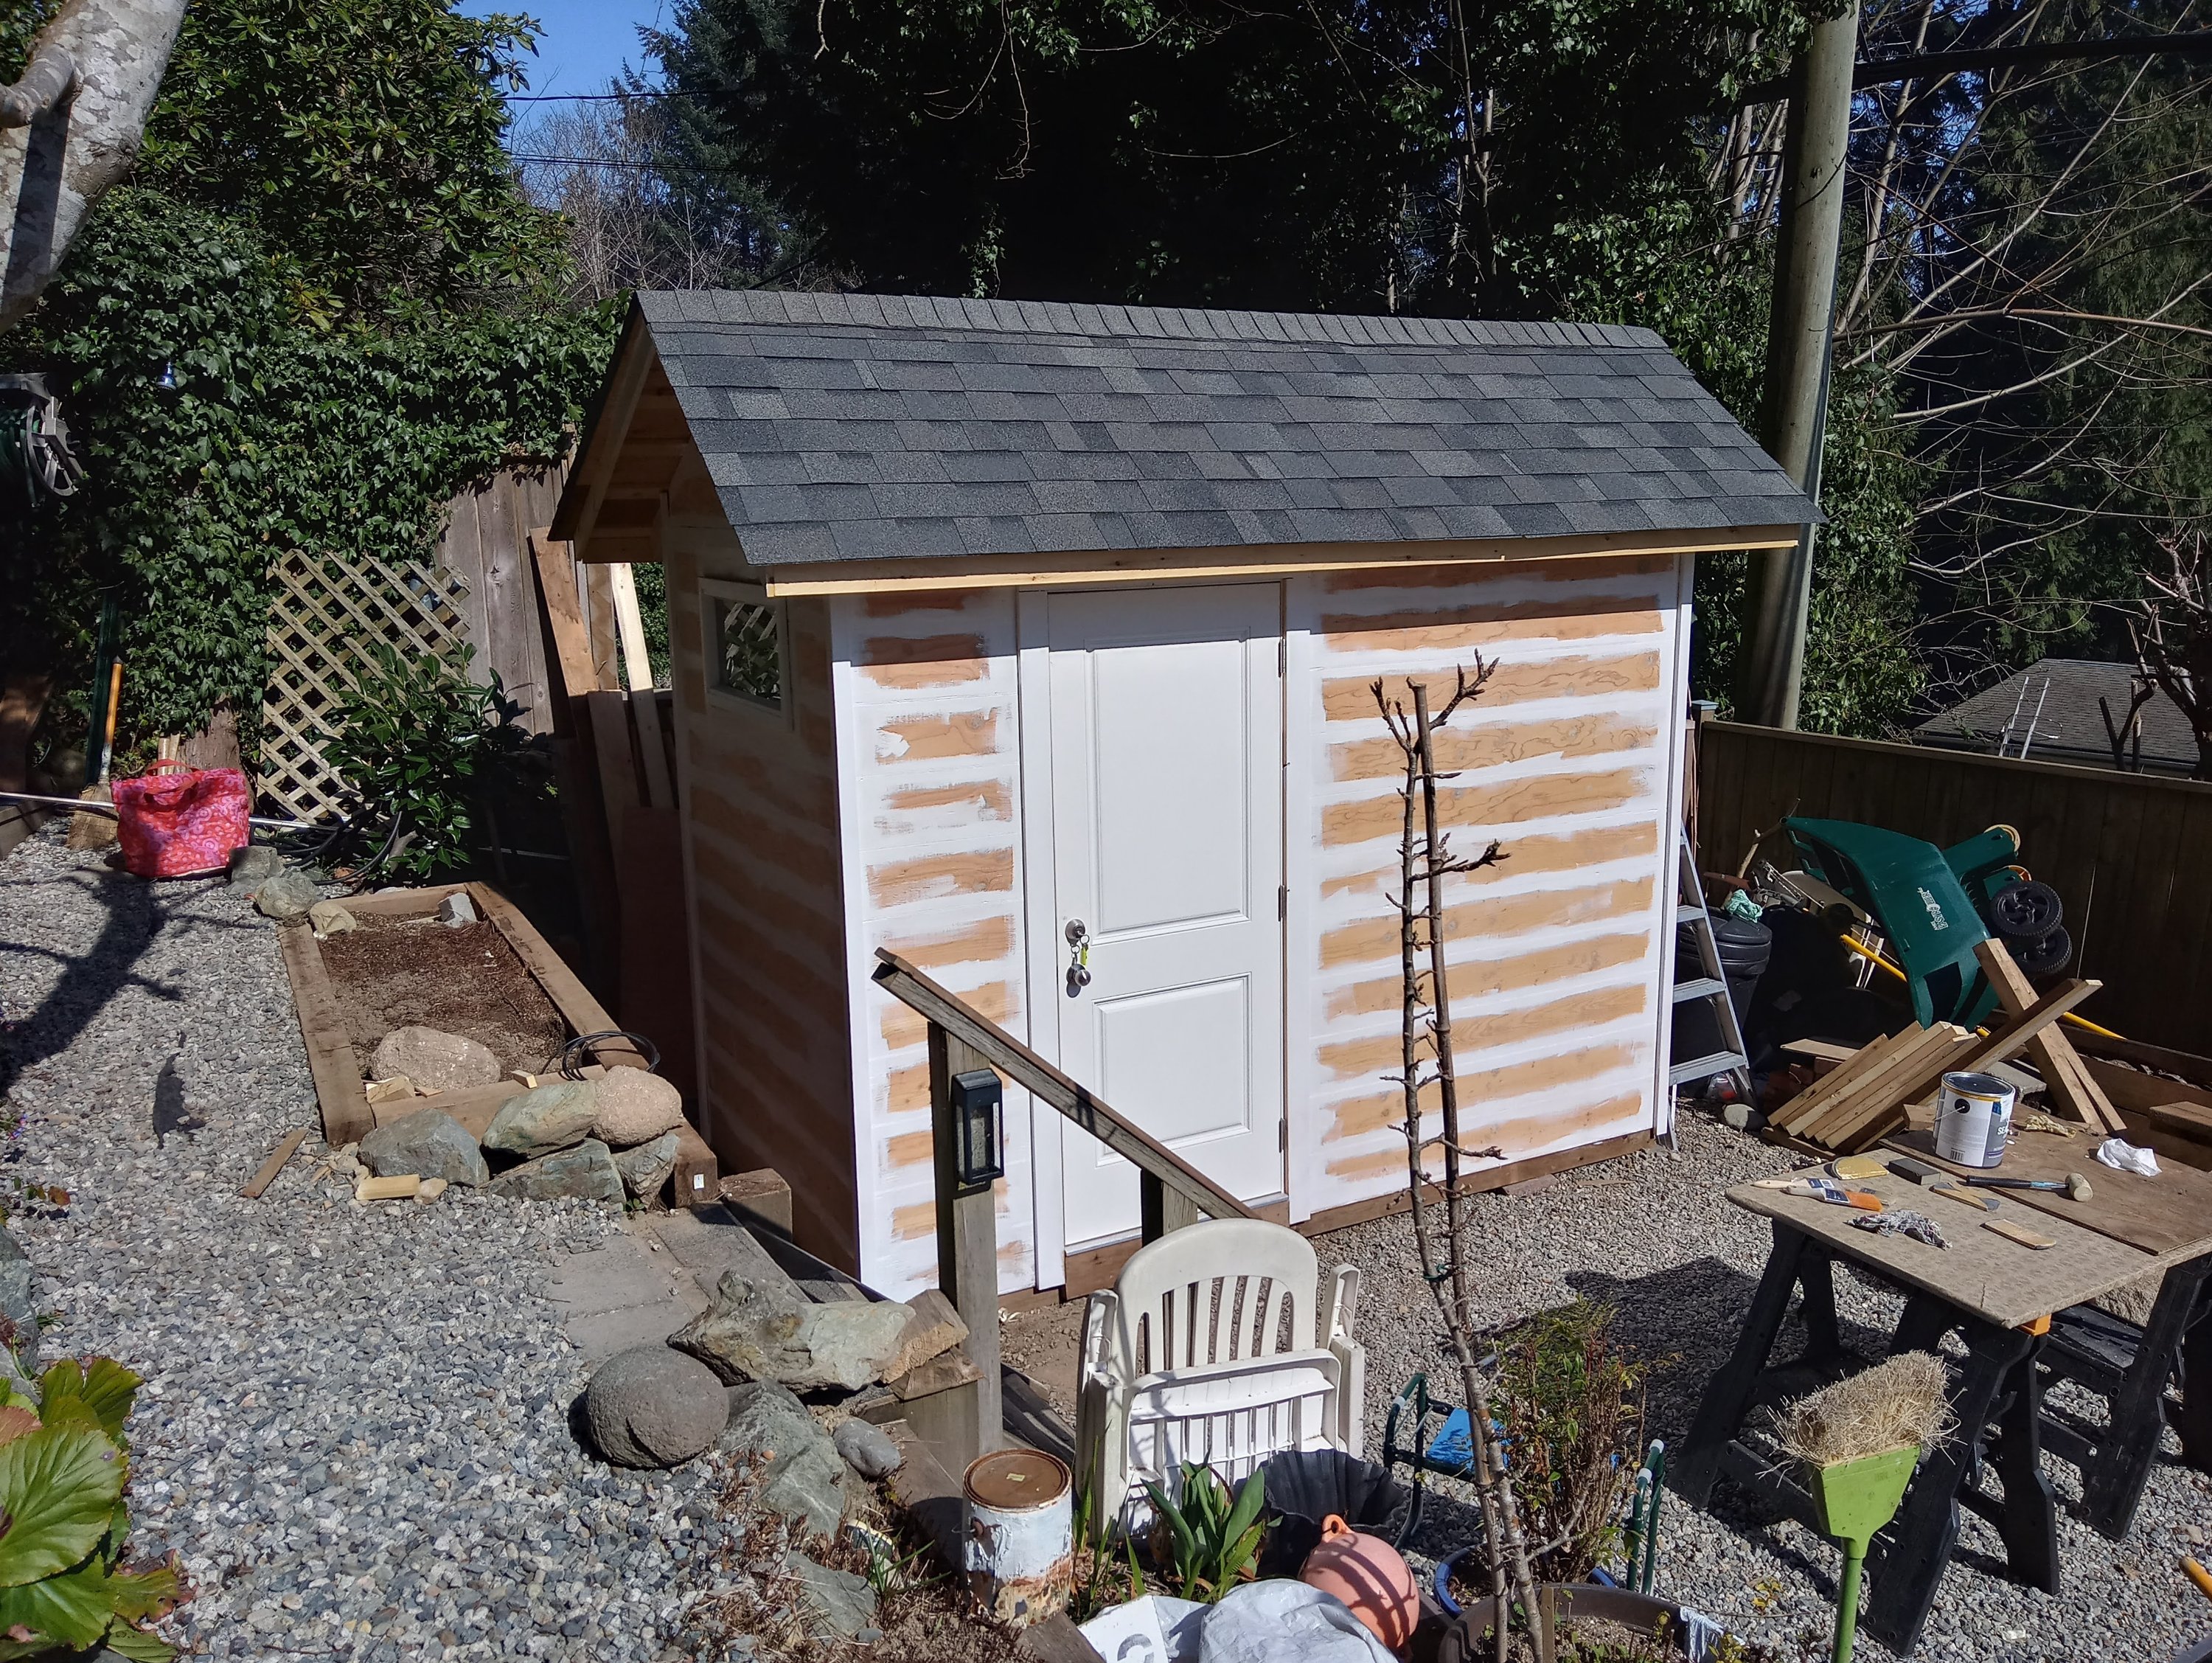
Prime it
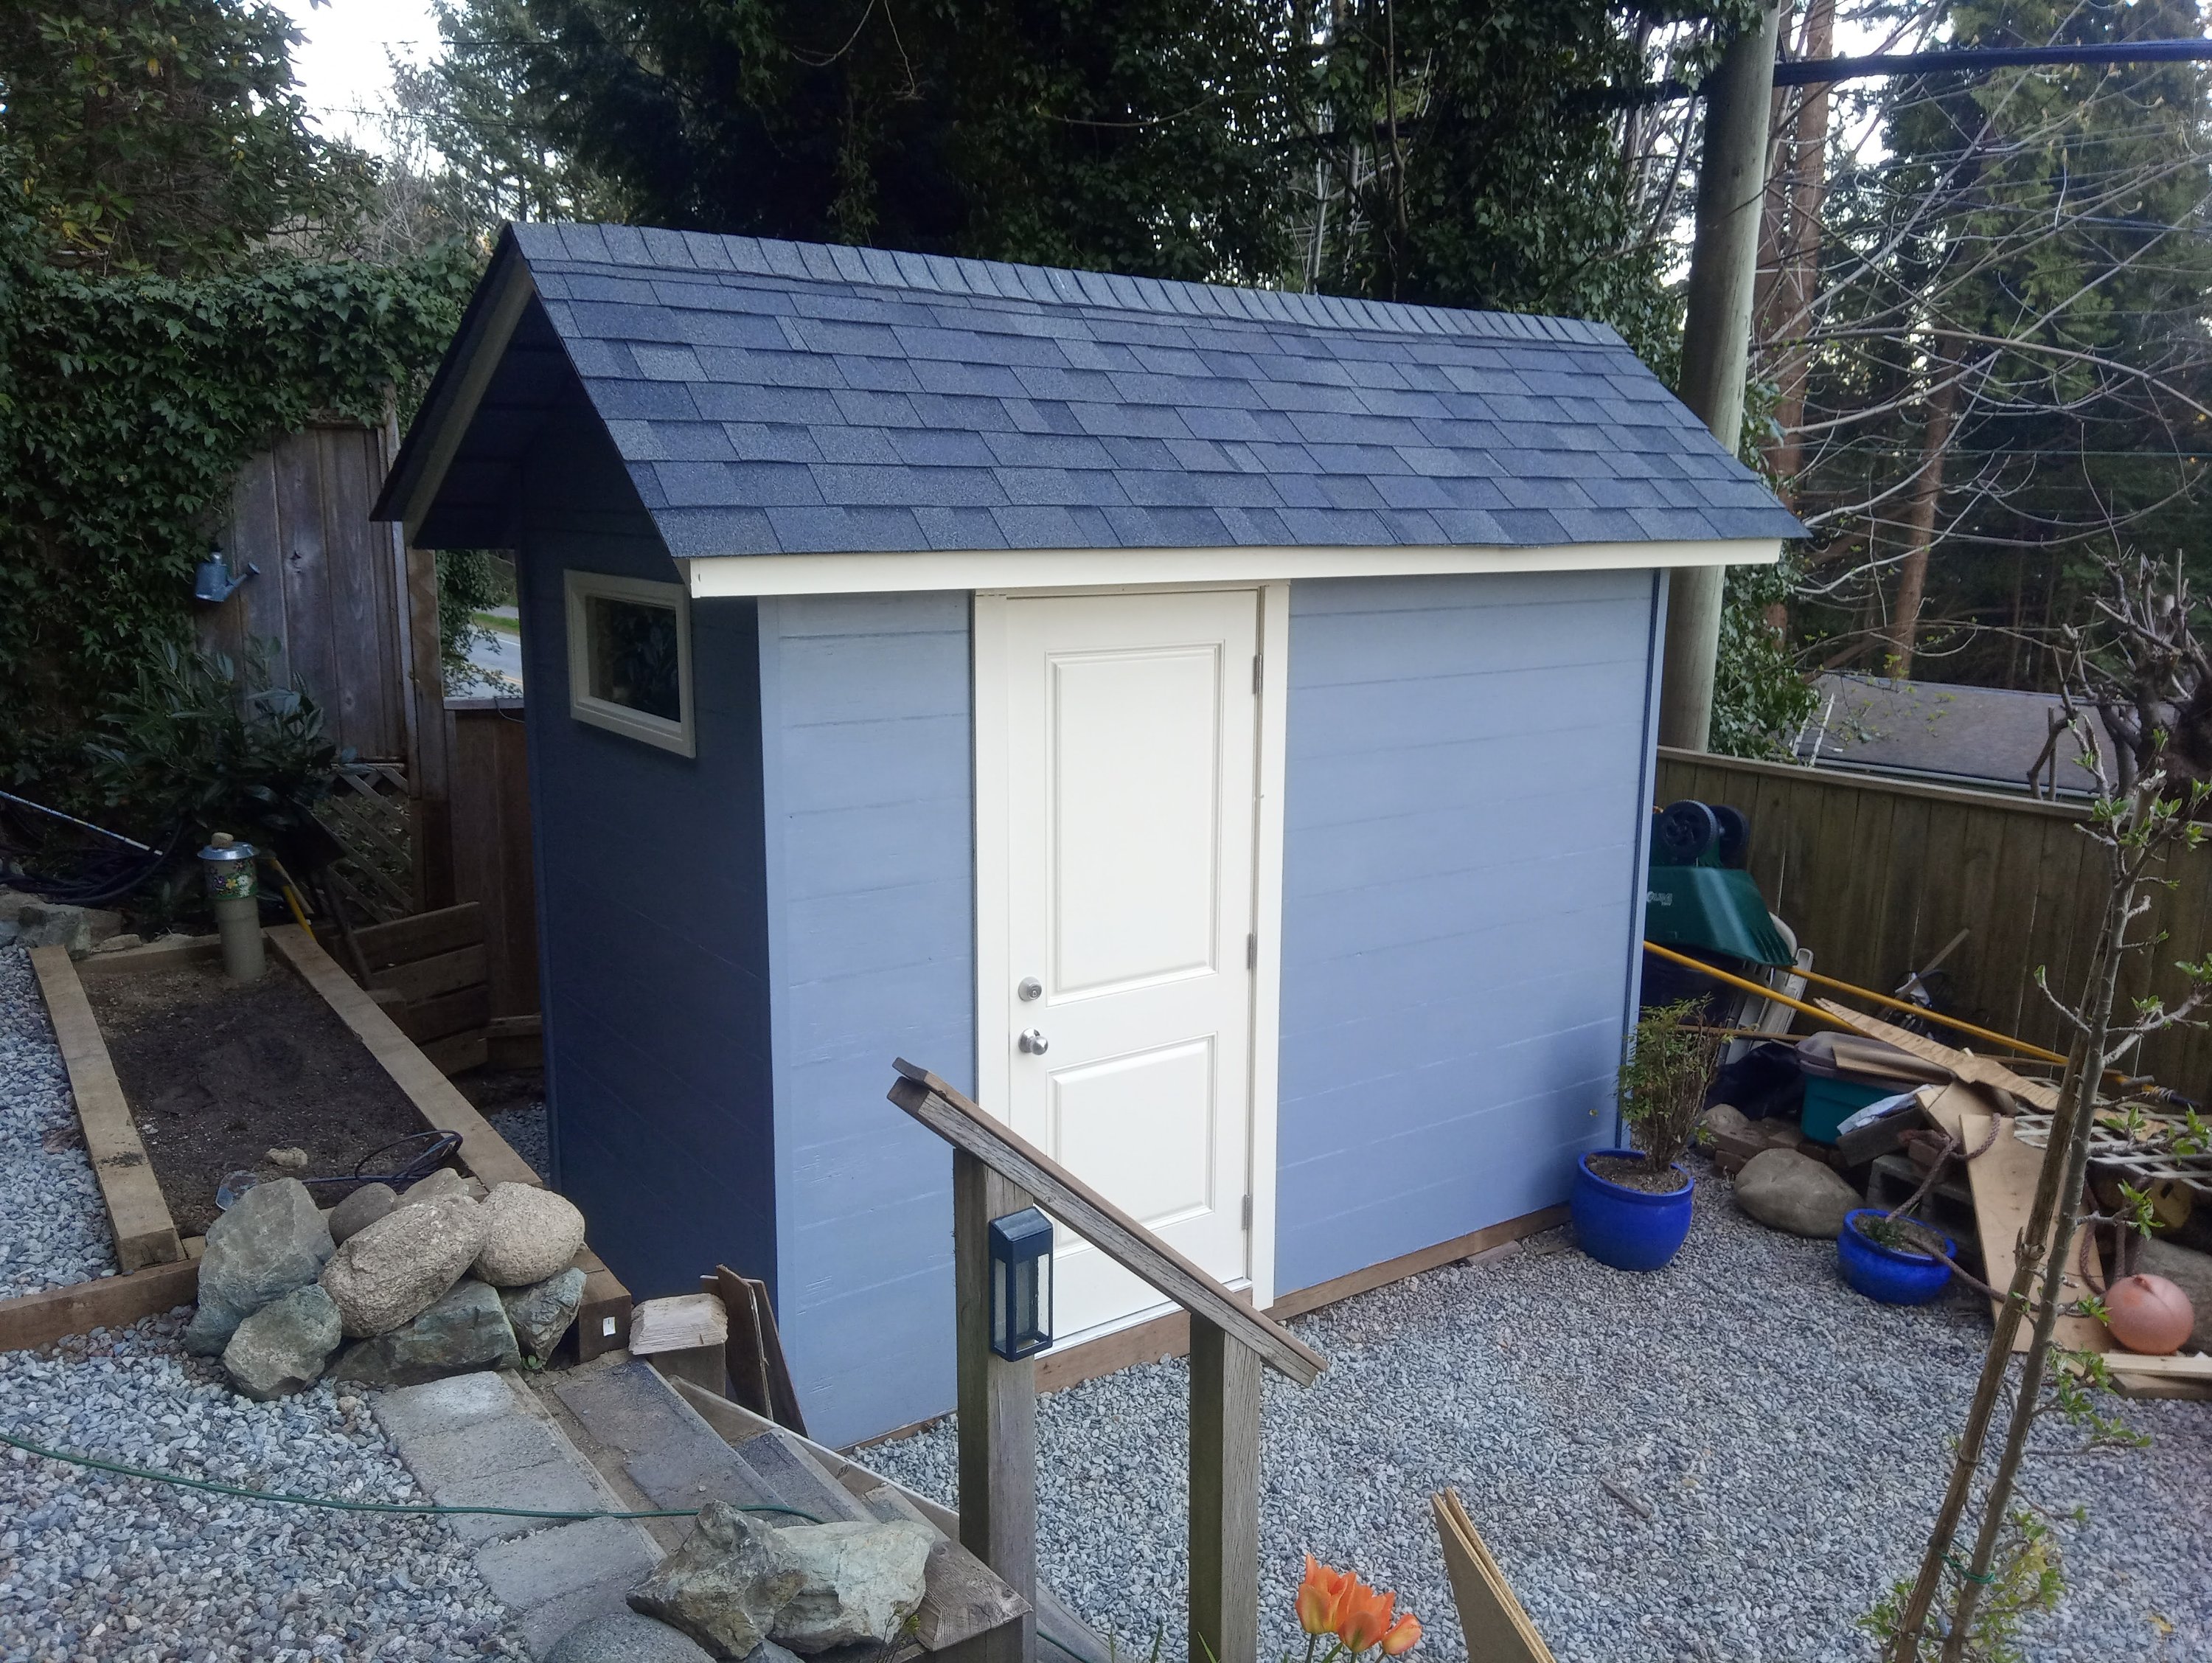
Paint it
Decorate it
It wasnt quite as quick and easy as the pics might lead you to believe, but it was a lot easier than last years’ shed build. It gives us an amazing amount of quality storage and could very easily be converted to a comfy bunky at some future date.
Pretty proud of the fact that my guy can do something like this, just off the top of his head. Bring on the apocalypse, ’cause I like our chances!
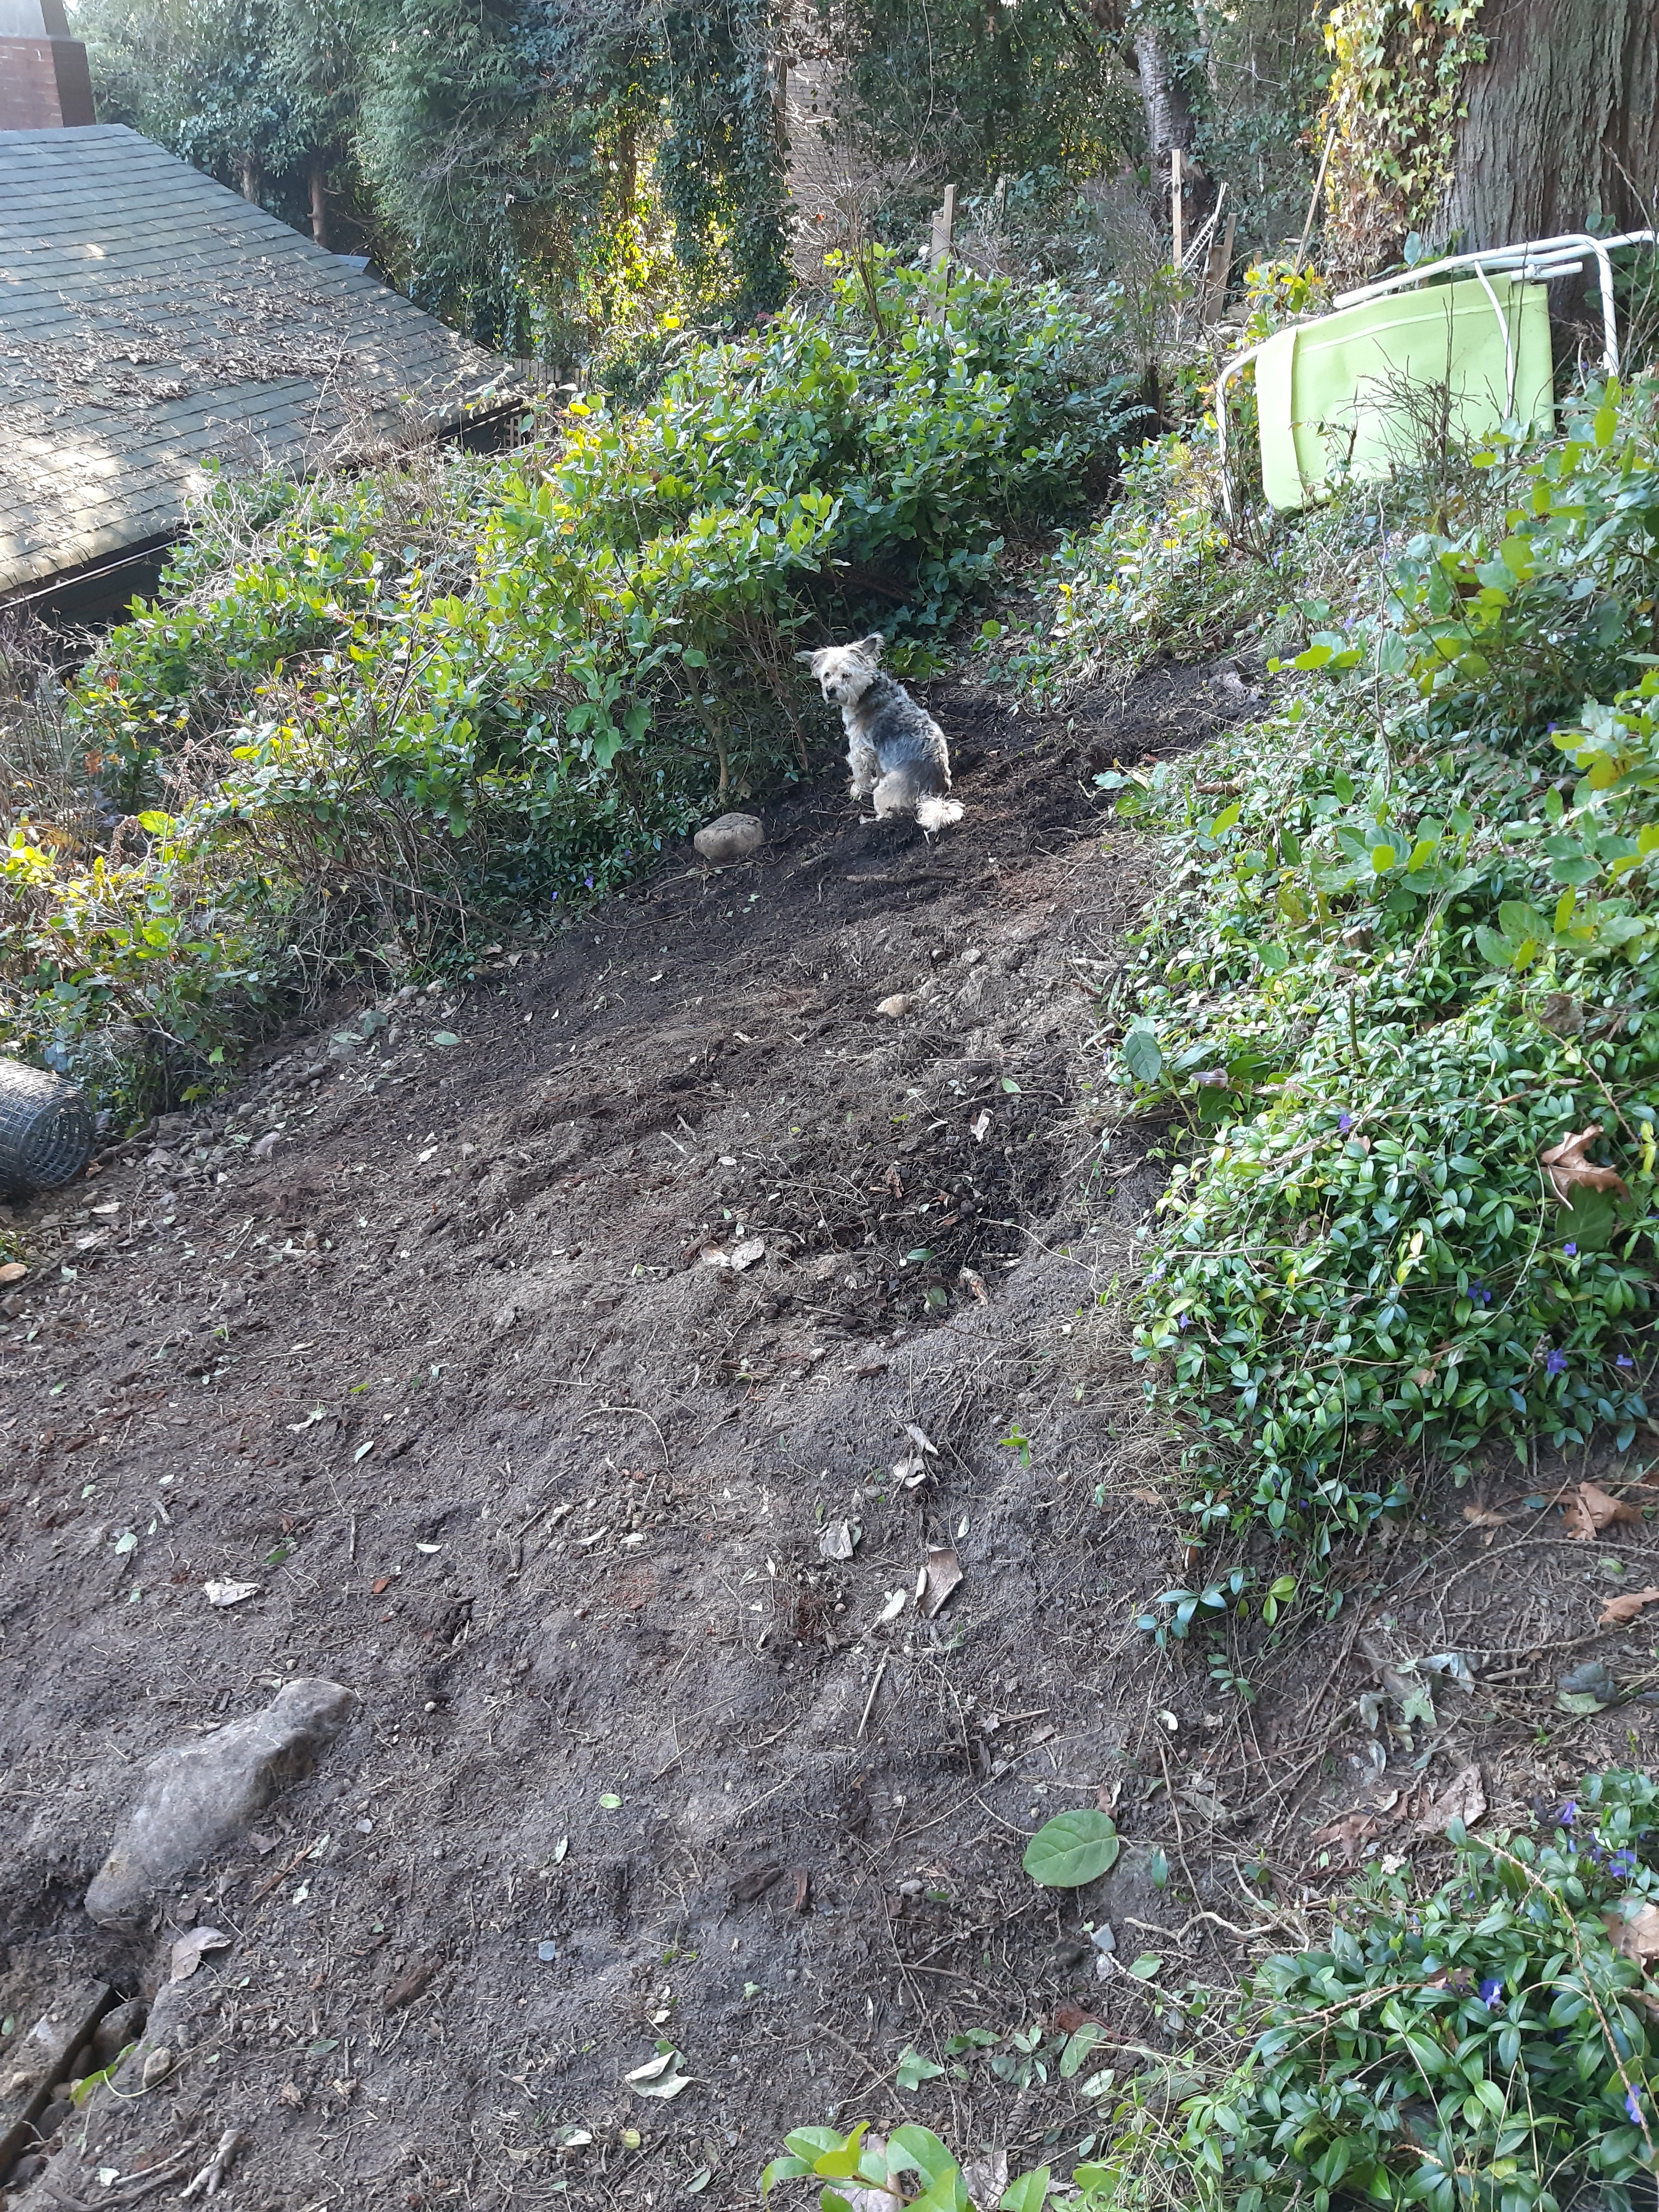
When it became clear that we would still be staying close to home for a lot of this year, I was resolved to create a vegetable garden on the sunniest spot available to me, no matter that it was super steep, and covered in an avalanche of salal and huckleberries.
I decided I had the time and excess energy to sculpt this hillside by hand. And I needed to do some physical labour to help me sleep better at night. Here is a pictorial report on my progress.
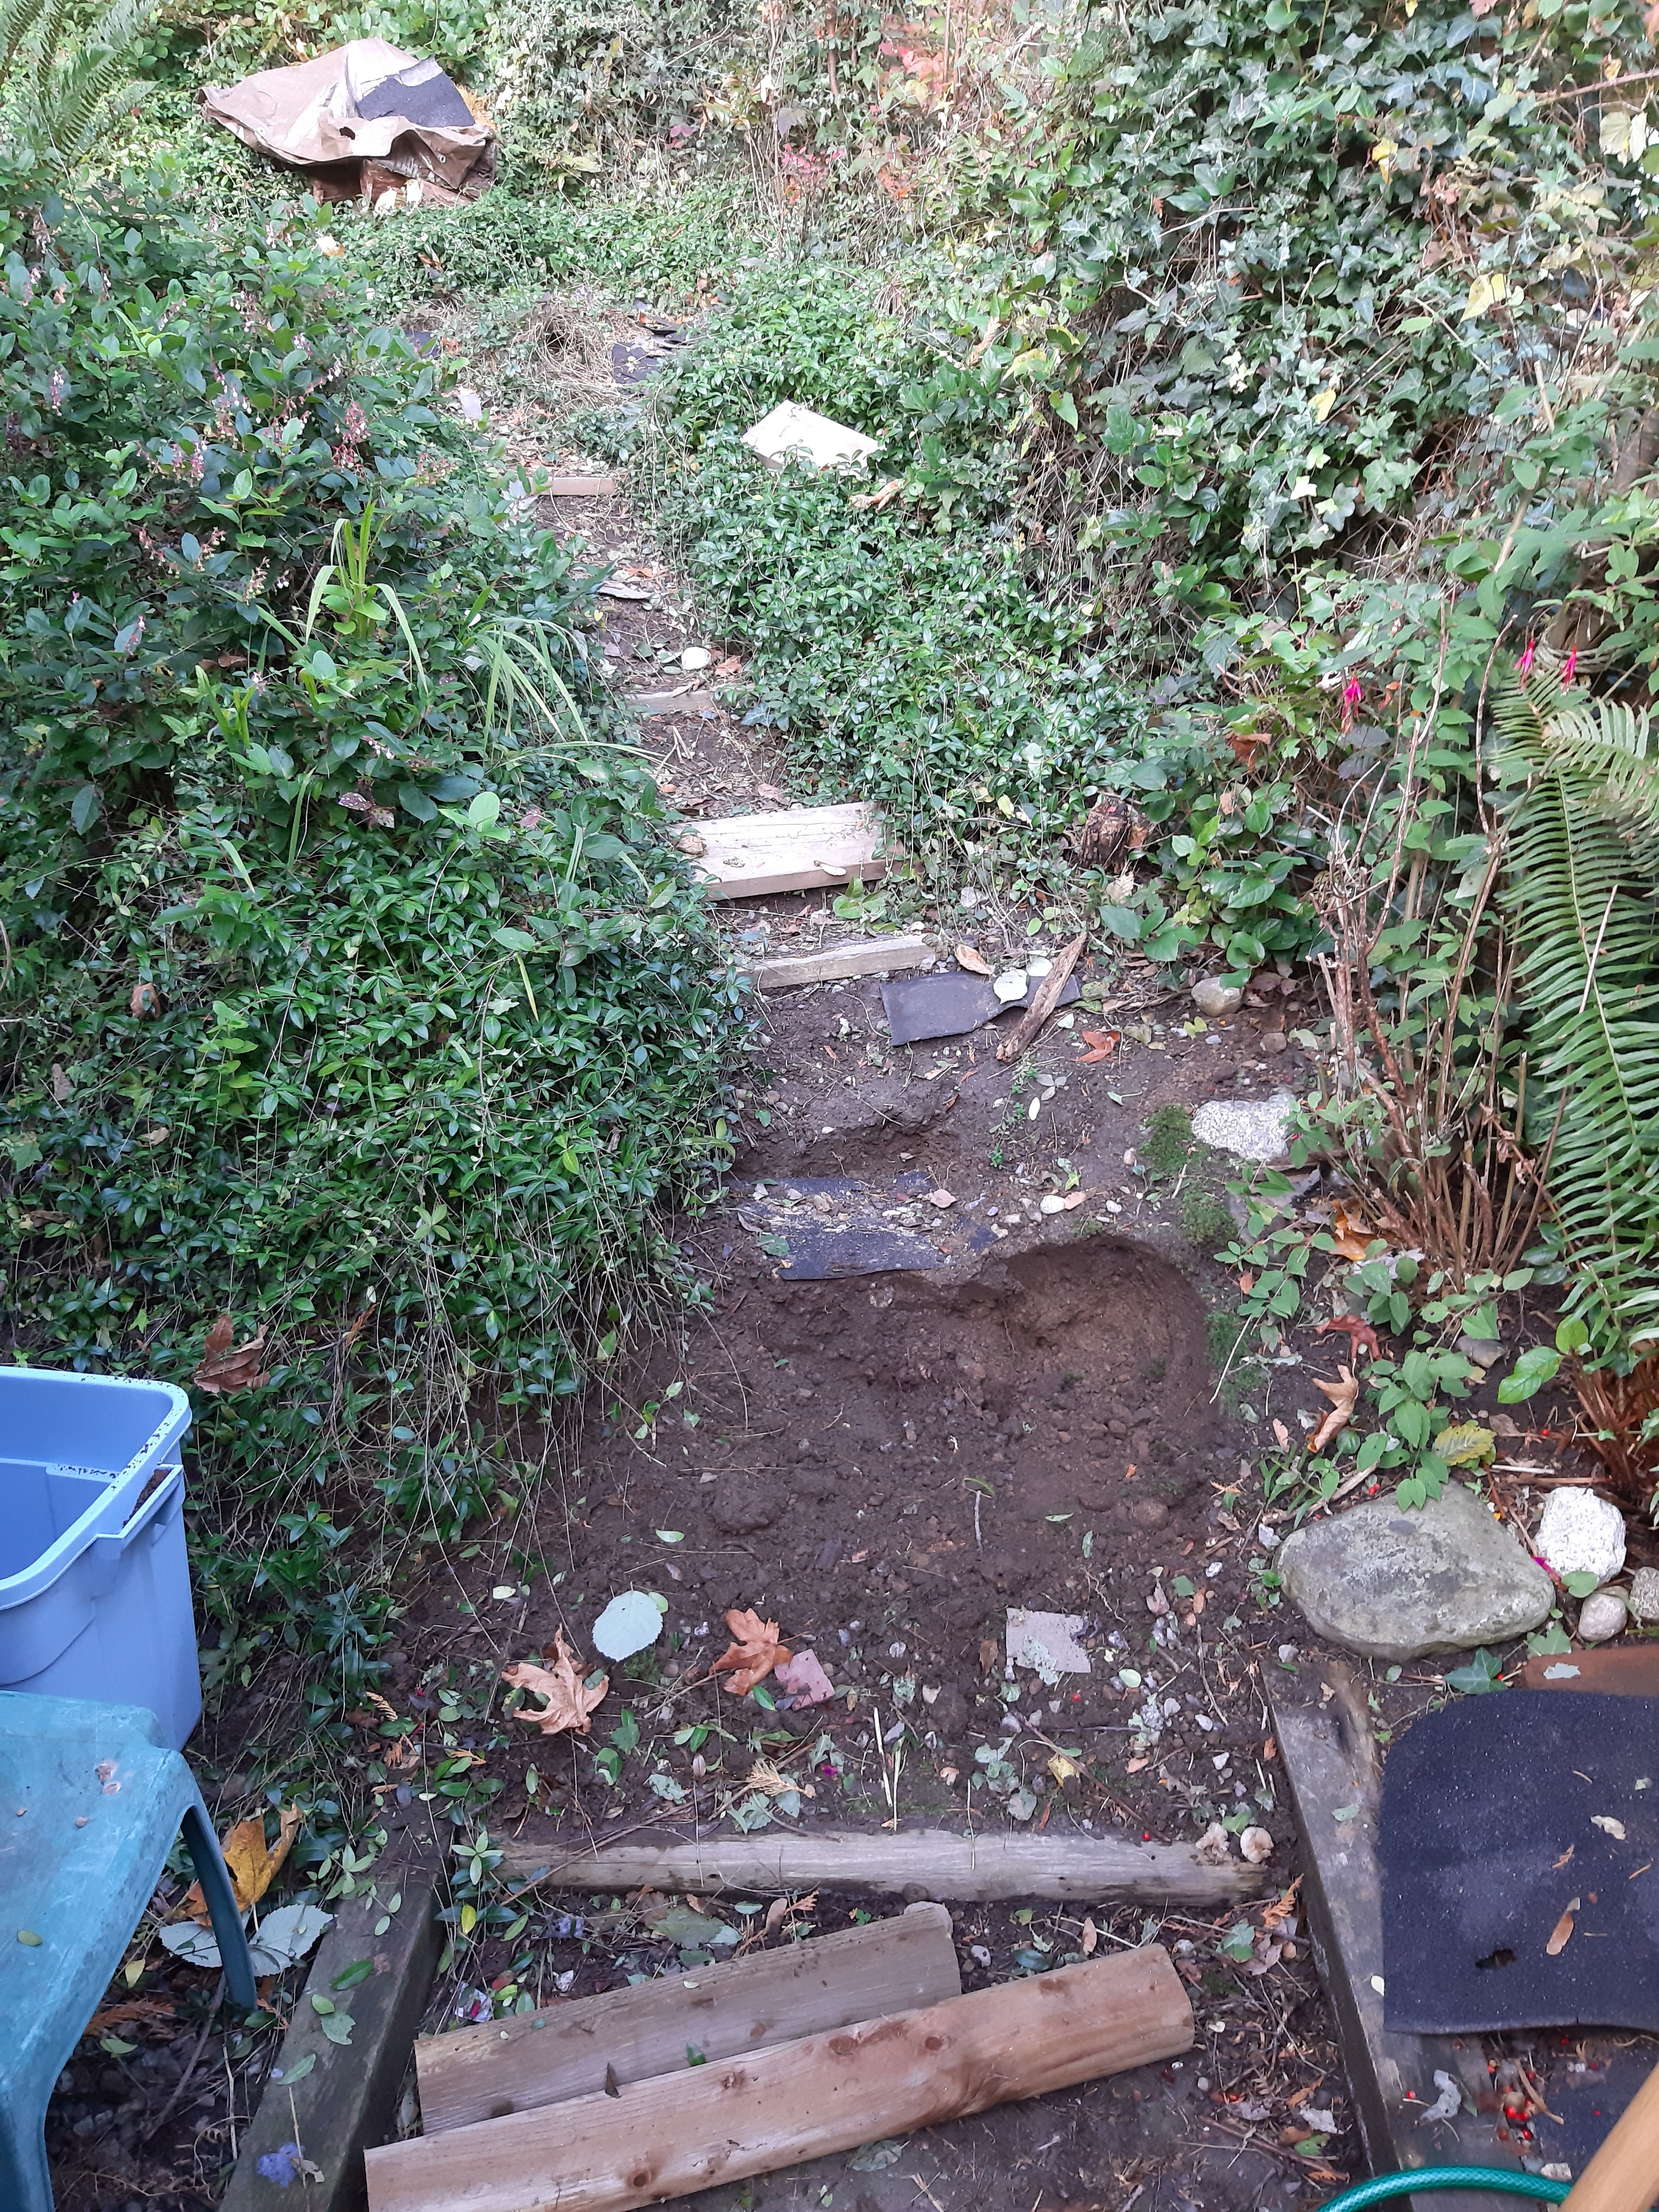
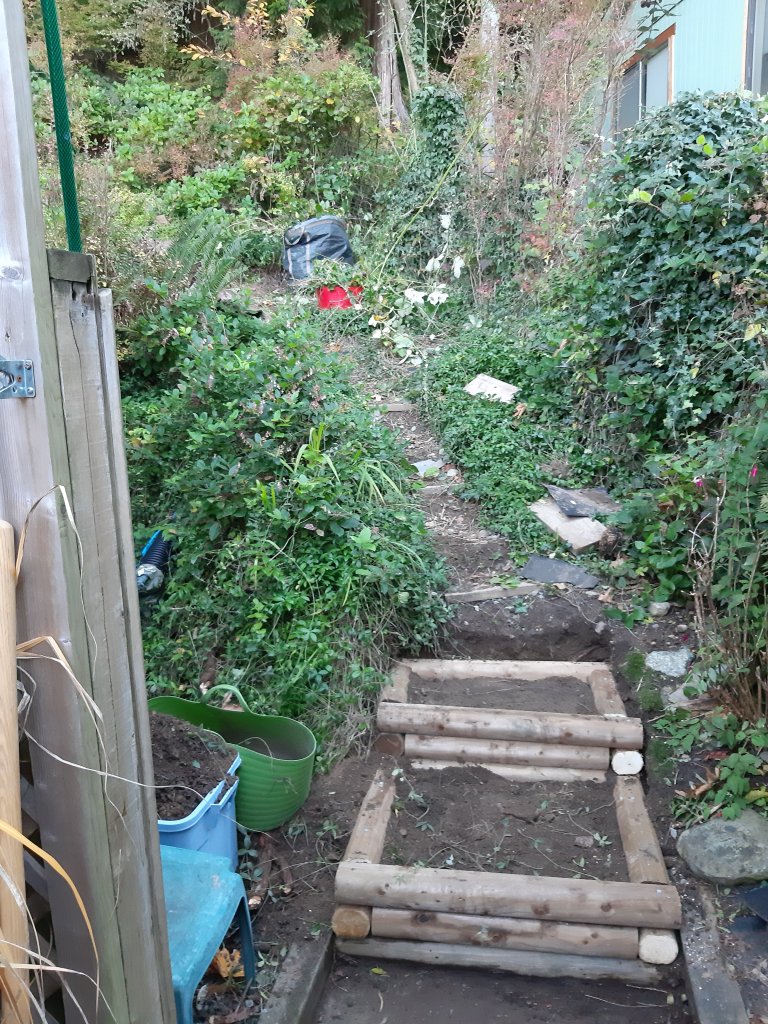
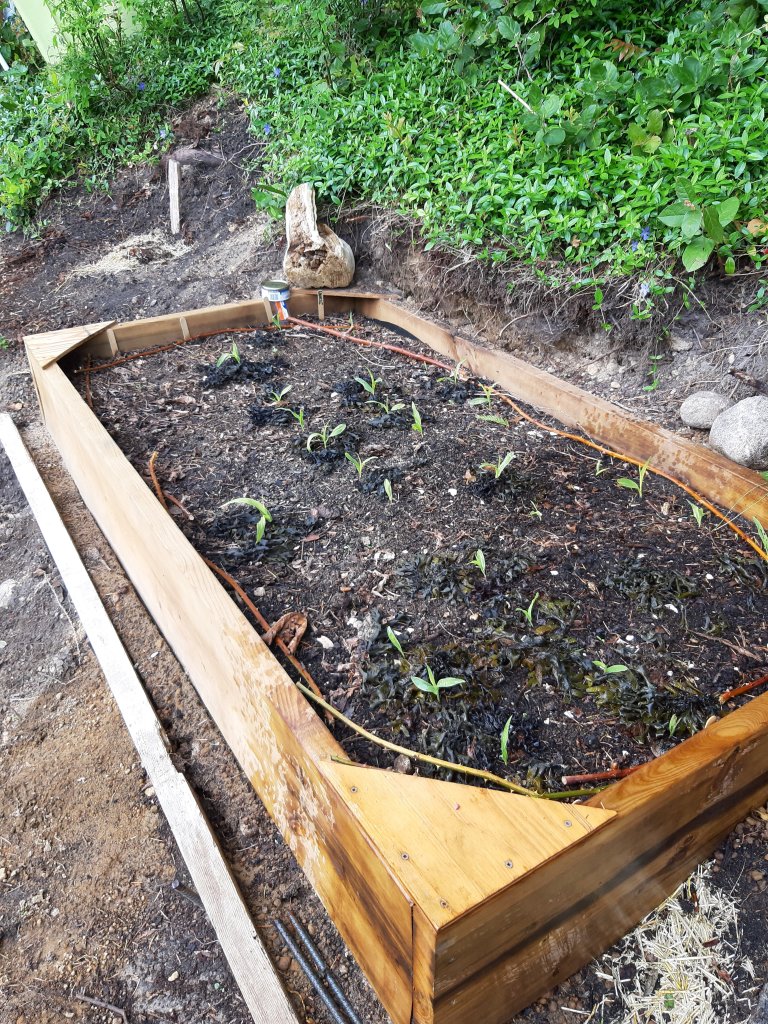
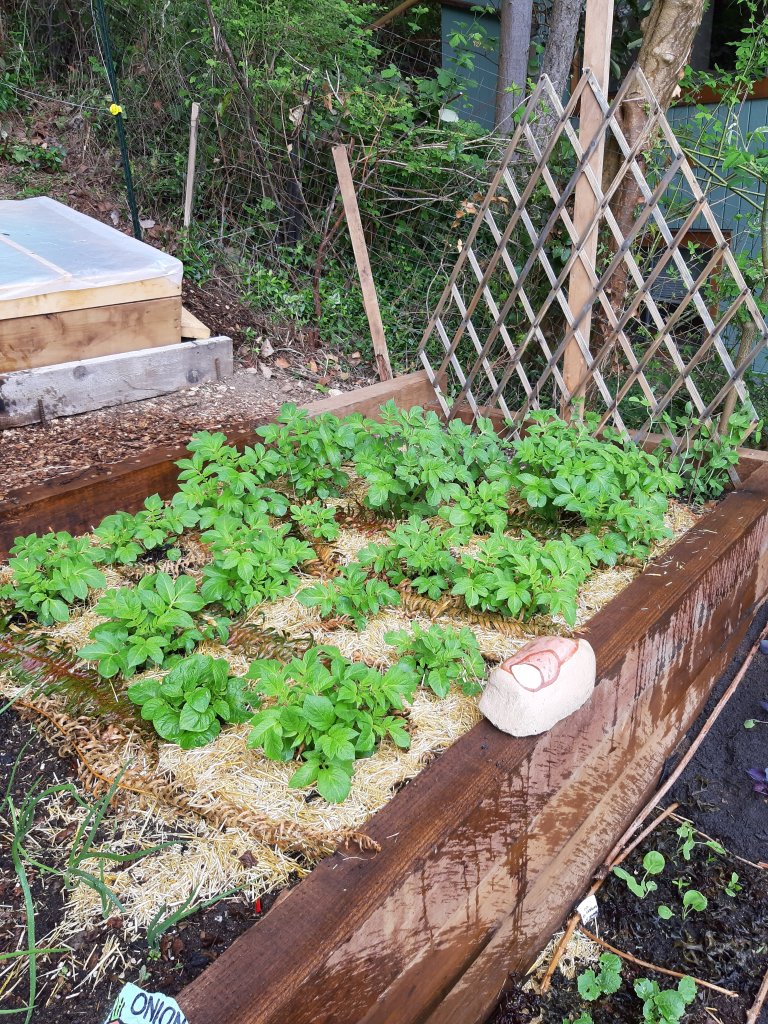
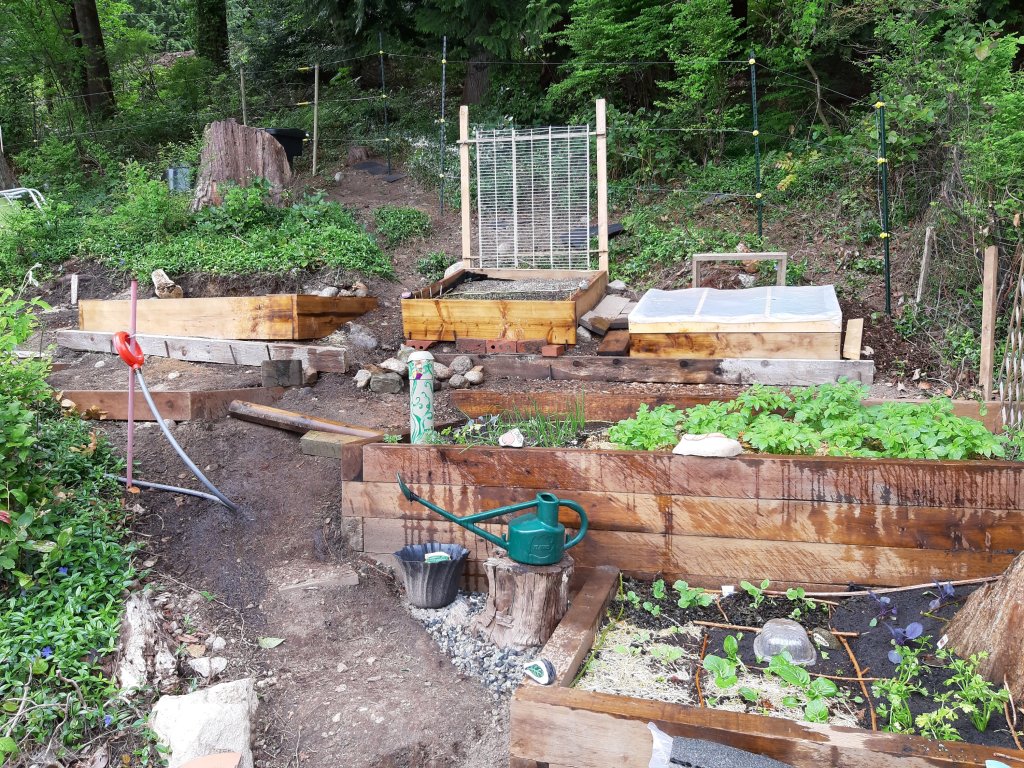
First I would need a few safe steps to get to the bottom of my building area. I dug ’em and my guy cut and screwed the steps together.Then I took over again to add landscape fabric and gravel. The dog supervised throughout.When I had proper access to the hilllside I used a mattock to start digging up the garden area.Did a TON of sifting of dirt and rocks.And once I had a large enough area dug up, we worked together to build raised boxes from (damp and very heavy!) 4×6 treated timbers.Top down view of the 2 terraced beds. The larger is planted with potatoes plus both seed and set spanish onions – a comparison experiment. And on the far side I left room for a triple row of snap peas. The smaller, lower box is for succession planting of salad greensAbove the two built in terraced beds, I cleared and mostly leveled additional space for a cold frame and another 4×4 raised bed.But wait! There’s more! I kept digging and leveling and made space for another raised bed just to the left. I’m going to try the 3 sisters here but so far corn germination is only at about 50%Onions and potatoes are doing well tho.And overall, the transformation from the first picture in this post and this final shot makes me feel vastly accomplished. A few more gravelled steps for safety and some soaker hoses are all I aspire to for this year. I’m going to sit back and watch it grow!
Last summer I cleared and dug up the flatish area where we had torn down an old unsafe deck behind the house. And I planted a garden there, watered, fertilized and fought off the brambles. But at the end of the day…there just wasn’t enough sun. The neighbour’s wildly overgrown and untended yard cast shadow even at midsummer. I ended up with a decentish crop of potatoes and not much else for my trouble.
But not one to let that effort go to waste, I thought long and hard about what I could do with this area. It would be a nice spot for a bunkie, but Rand has built 2 sheds in 2 years so that would be a tough sell.
The answer came at Christmas time when we cut a fresh tree at a farm in Robert’s Creek and it was lovely…didnt drop a needle and we loved it. Less enthusiastic about the 80$ price tag because this was a small tree. Out cottage is 800 sf so the tree had to max out at 5ft at the tippy top to be slim enough for our space.
80$ for this shrub.
So this spring I ordered 3 Grand fir and 3 Noble fir from the local nursery. They brought in Grand fir and Douglas fir instead so I ended up with 4 of the former and 2 of the later.
A little less than 80$ for six nice treelings in one gallon pots.
The nursery man, Lorenzo, told me to put a banana peel in each hole. He may have been punking me. But I did it.
It will be a just a few years before these reach the proper size we are after, and then we will cut and replace 1 per year. The location is perfect for a small tree plantation. Aside from occasional weeding of the area, if I can keep them happy and growing through this first summer they will be established enough to pose little trouble and bring yearly happiness.
When I came across this idea while researching composting I was smitten! Enrich my garden soil and have a fun pandemic craft! Yes please.
UPDATE:
I cut some corners on my third tower and would do so again. The connector piece, the screen and the one inch cut all seem superfluous PROVIDED you have a lid on your tower.
In short, you need a pipe with holes drilled below ground level and a lid to keep critters out. That’s it.
For this final tower, I had painted a connector, so I added it. But once the connector goes on it becomes hard to get off if any grit gets in between it and the tower. So, following the KISS principle, I put a galvanized garden saucer over it and a rock to weigh to down. It was the easiest to make and the easiest to service. So my advice is to skip steps 2 and 7 below and focus on the tower and a lid.
At some future date I will replace this grubby rock with a painted one to indicate there are worms at work inside.
I will report back on this project, (DONE!) but for now, here is what I have done, based on a variety of on line sources including the Habitat for Humanity website and various YouTube videos.
Disclosure: Not an expert on composting, vermiculture, gardening or anything much else. Not selling anything. Ever.
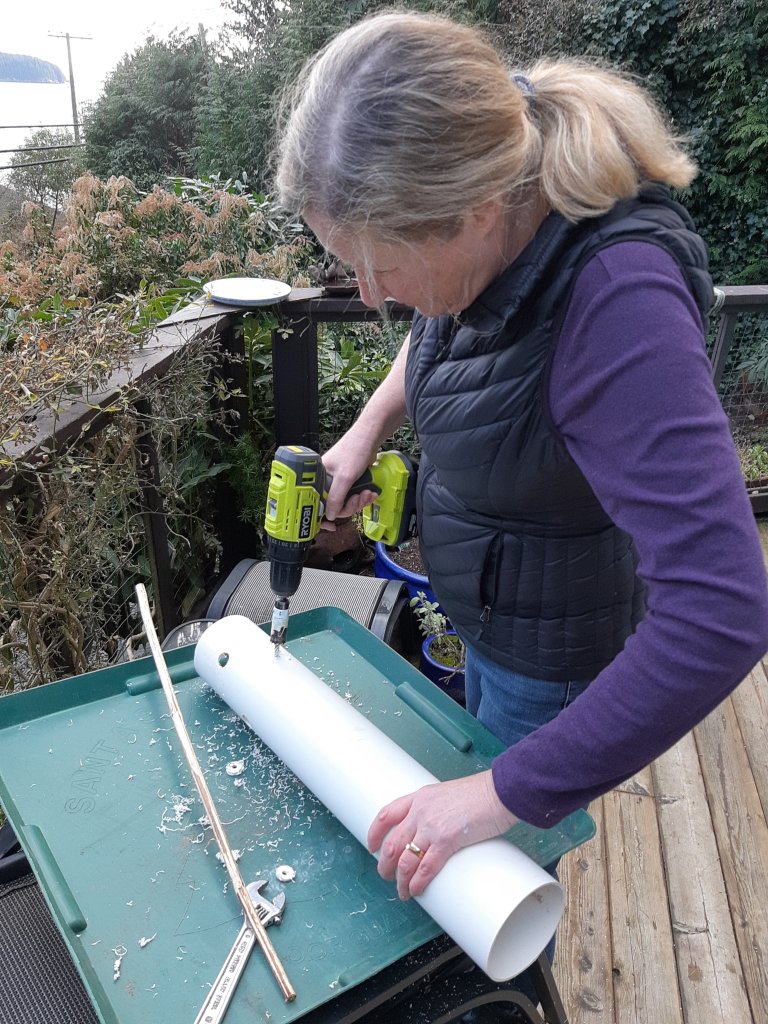
This is going to be quick and snappy because it’s a simple concept. Please excuse the use of inches and feet. Apparently, I’m old.
What you need:
PVC pipe, PVC pipe connectors, a drill with a largish bit, a small amount of fine netting and then the sky’s the limit in terms of optional decor.
Step 1
Buy a length of PVC drainpipe (roughly 4 inch diameter) cut it into lengths of at least 18 inches and not more than 24 inches. I had a 10 foot length so 5 equal pieces for five worm towers
Step two
Cut a one inch round off each section of pipe and set aside.
Step 3
Drill 3/8th or 1/2 inch holes randomly in the bottom 10 inches of the pipe ONLY. Use sand paper or steel wool to smooth these holes and remove loose bits of plastic inside and out.
Randomly drilling 1/2 inch holes in one end only.
Step 4
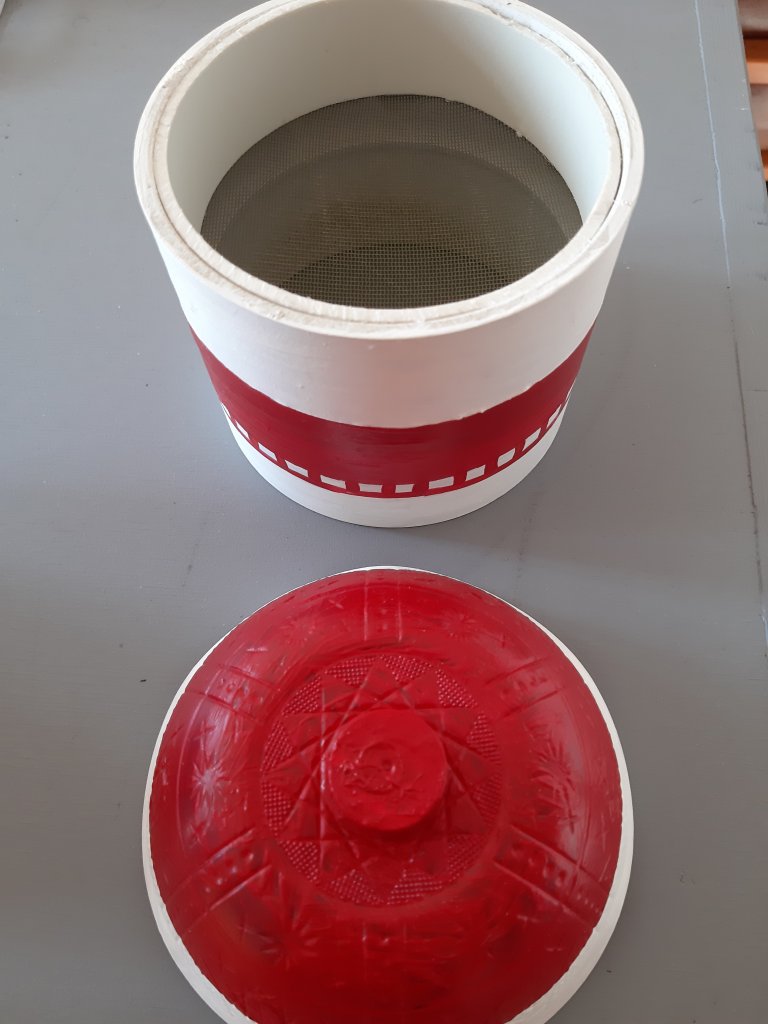
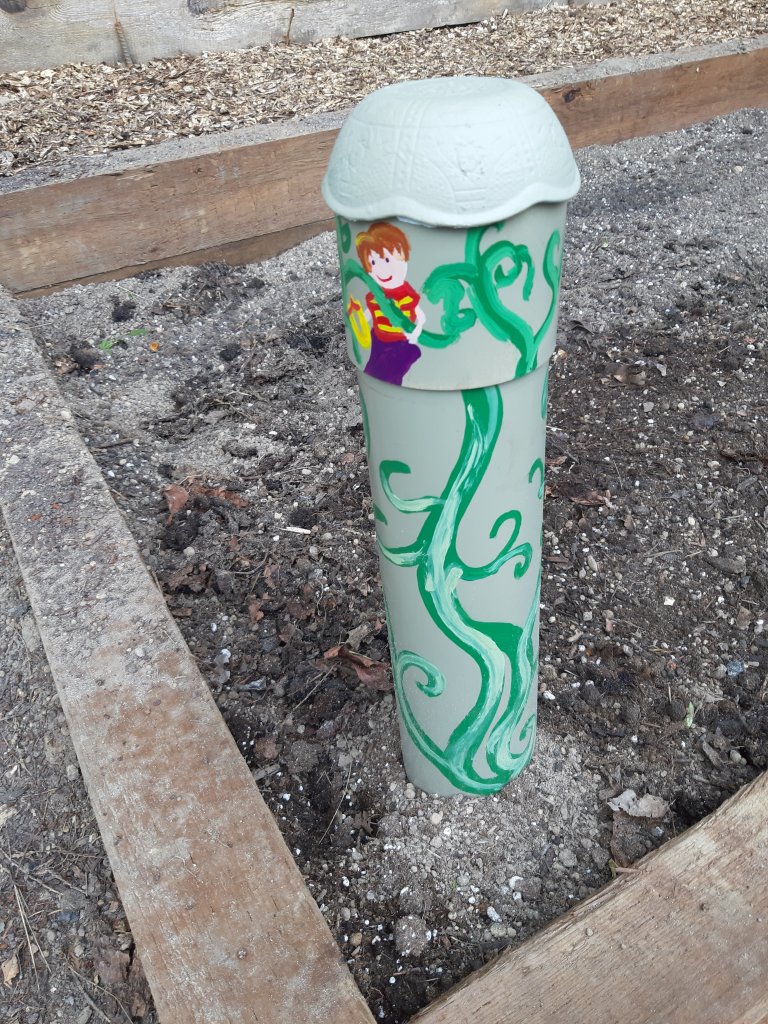
Paint or decorate each piece of pipe plus one connector piece. Start with a spray paint suitable for plastic, followed by dollar store acrylic craft paint or whatever you have. Throw your imagination at this!
Once satisfied with your 2- piece design, spray liberally with UV proof clear gloss and allow to dry.
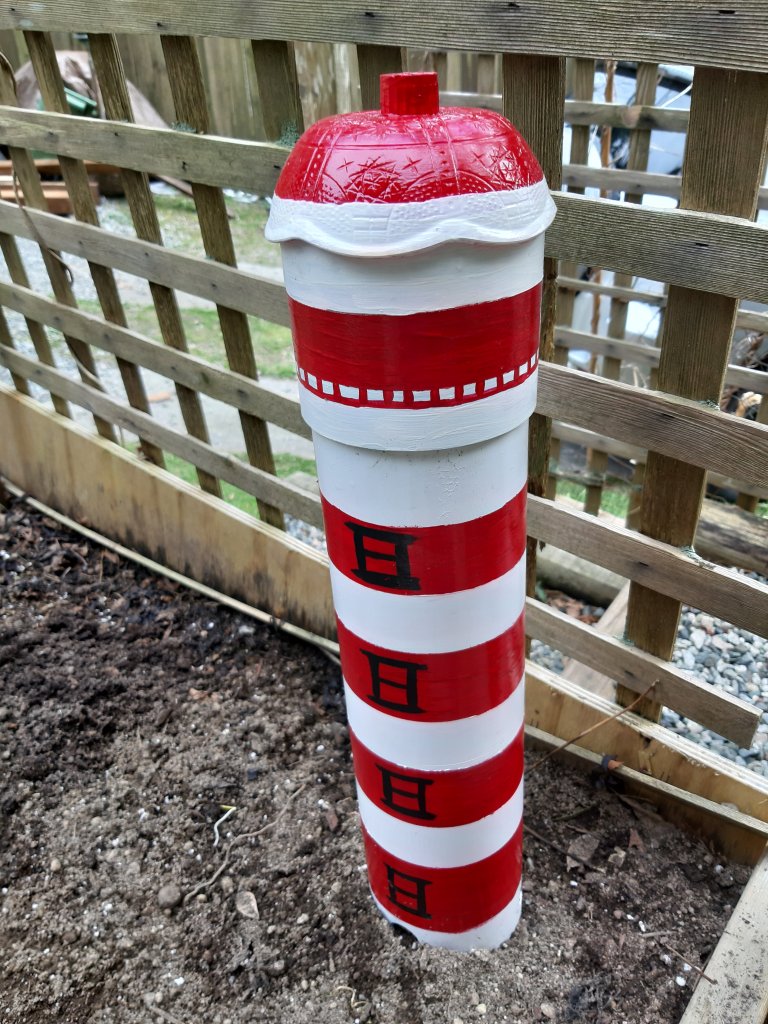
This one is a lighthouse design. If you couldn’t tell, that’s ok
Step 7
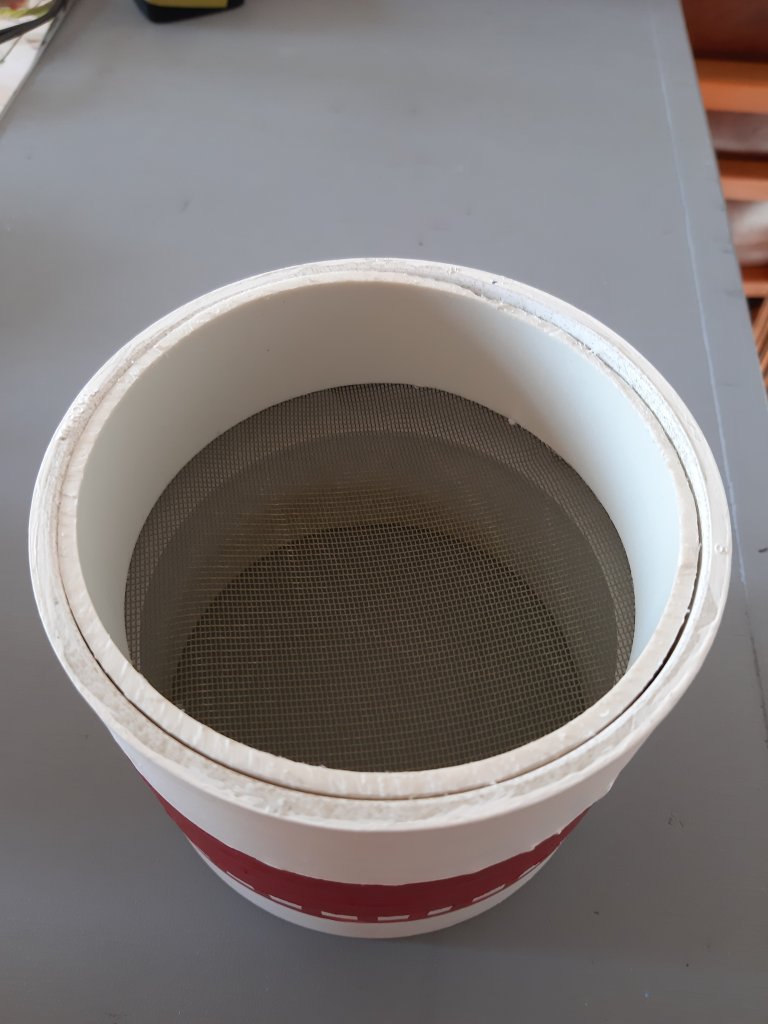
Cut a circle of netting 1/2 inch larger than diameter of connector piece. Place it over the 1 inch piece of pipe you cut off in step 2, then gentle and evenly mallet the 1 inch piece into the top side of your connector piece. It is now holding the screen taut inside the connector pipe. This will keep flies in or out or something….
Screening at mid point of connection piece, held in place with the one inch bit you cut off the tube.
Finally you need a lid because worms like it dark and moist. You can use an old tea saucer, a terra cotta potting saucer, or anything similar that covers the top of the connector pipe. If it isn’t heavy enough to survive the wind, glue it on.
I wanted a rounded shape for my top so I used a plastic bowl, and used a glue gun to affix it.
Final steps: Installation
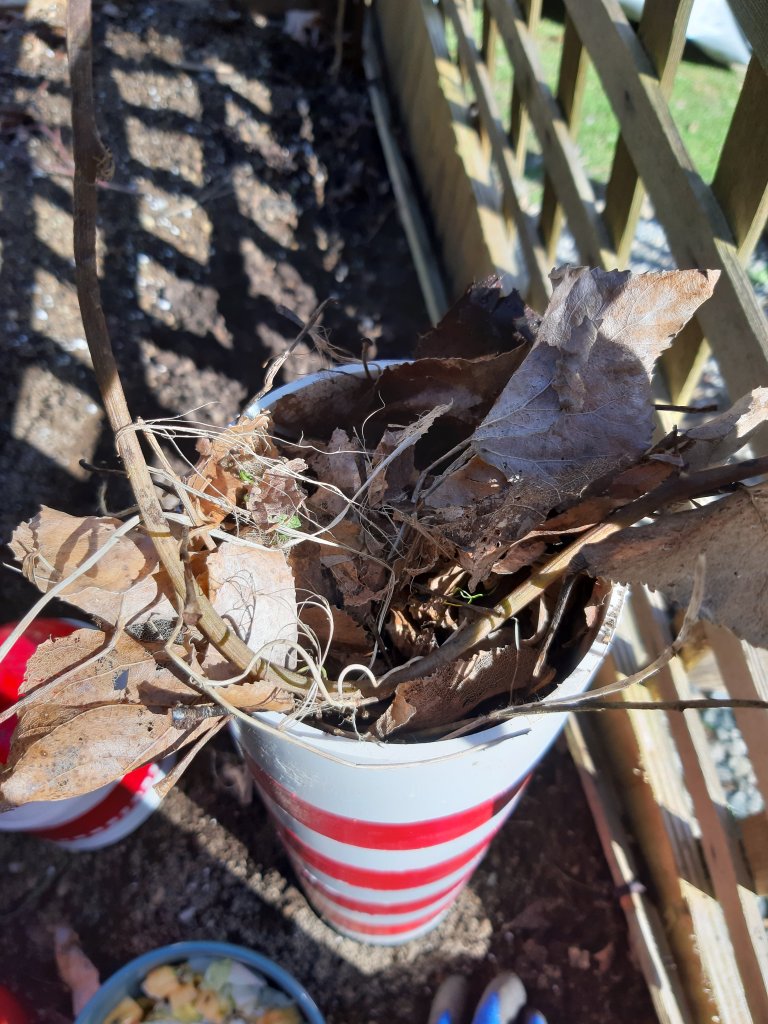
Pick a shadier corner of your garden for summer and a sunnier spot for the cold months.
Dig a hole 1 ft. deep and place your tower, holes down and straight. Fill in the earth around it until all the drilled holes are covered.
Place a handful of dry leaves or shredded black and white newsprint in the bottom. Now put your red wriggler composting worms in the tube. A few hundred per tower.
Browns first for bedding.Worms aren’t photogenic but there is one precisely in the centre of frame.
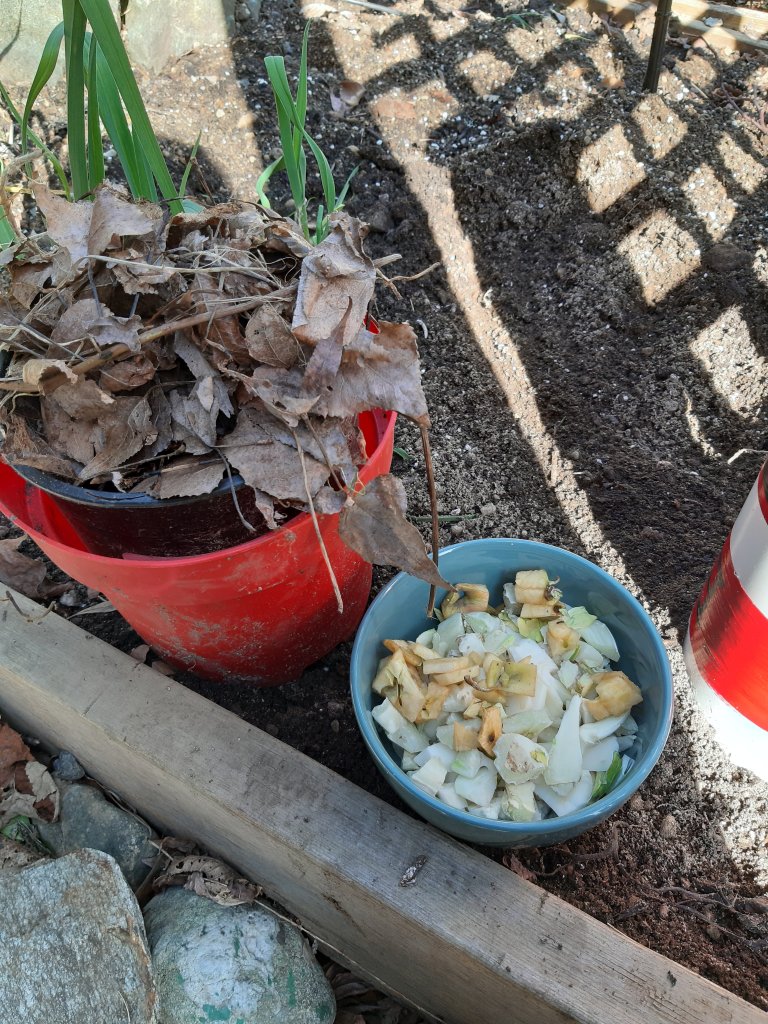
Next put in your chopped kitchen waste: almost any fruit or veggie you eat, they will eat though they aren’t fond of citrus and onions and garlic.
A bowl of chopped raw cauliflower waste and apple cores. Yum! Followed by (last layer) more leaves and some soil.
Now gently place your screened piece on top and then your lid if it isnt glued on. If your connector piece doesn’t slip on and off easily for refilling – perhaps because of paint layers – sand the top of the tube lightly and apply a bit of cooking oil with a paper towel.
What about now? Look a bit like a lighthouse now?Ta Da!
Feed your worms once a week, and add a little water to your chopped kitchen waste each time to keep the tower moist. Always a few browns on top.
Remove the tower, clean it out (corralling your worms) and move it twice a year or so.
Important: don’t mix regular earthworms into your towers! Rumour has it the red worms will eat them!
Its warming up, lightening up and we are revving up all the projects we spent the last 3 dark, wet months talking about. Finally.
The First Big Project is (another!) new shed. Last year’s model is really more of a workshop so we still need weather proof, vermin proof and highly functional storage space for boating equipment, gardening gear and our bicycles.
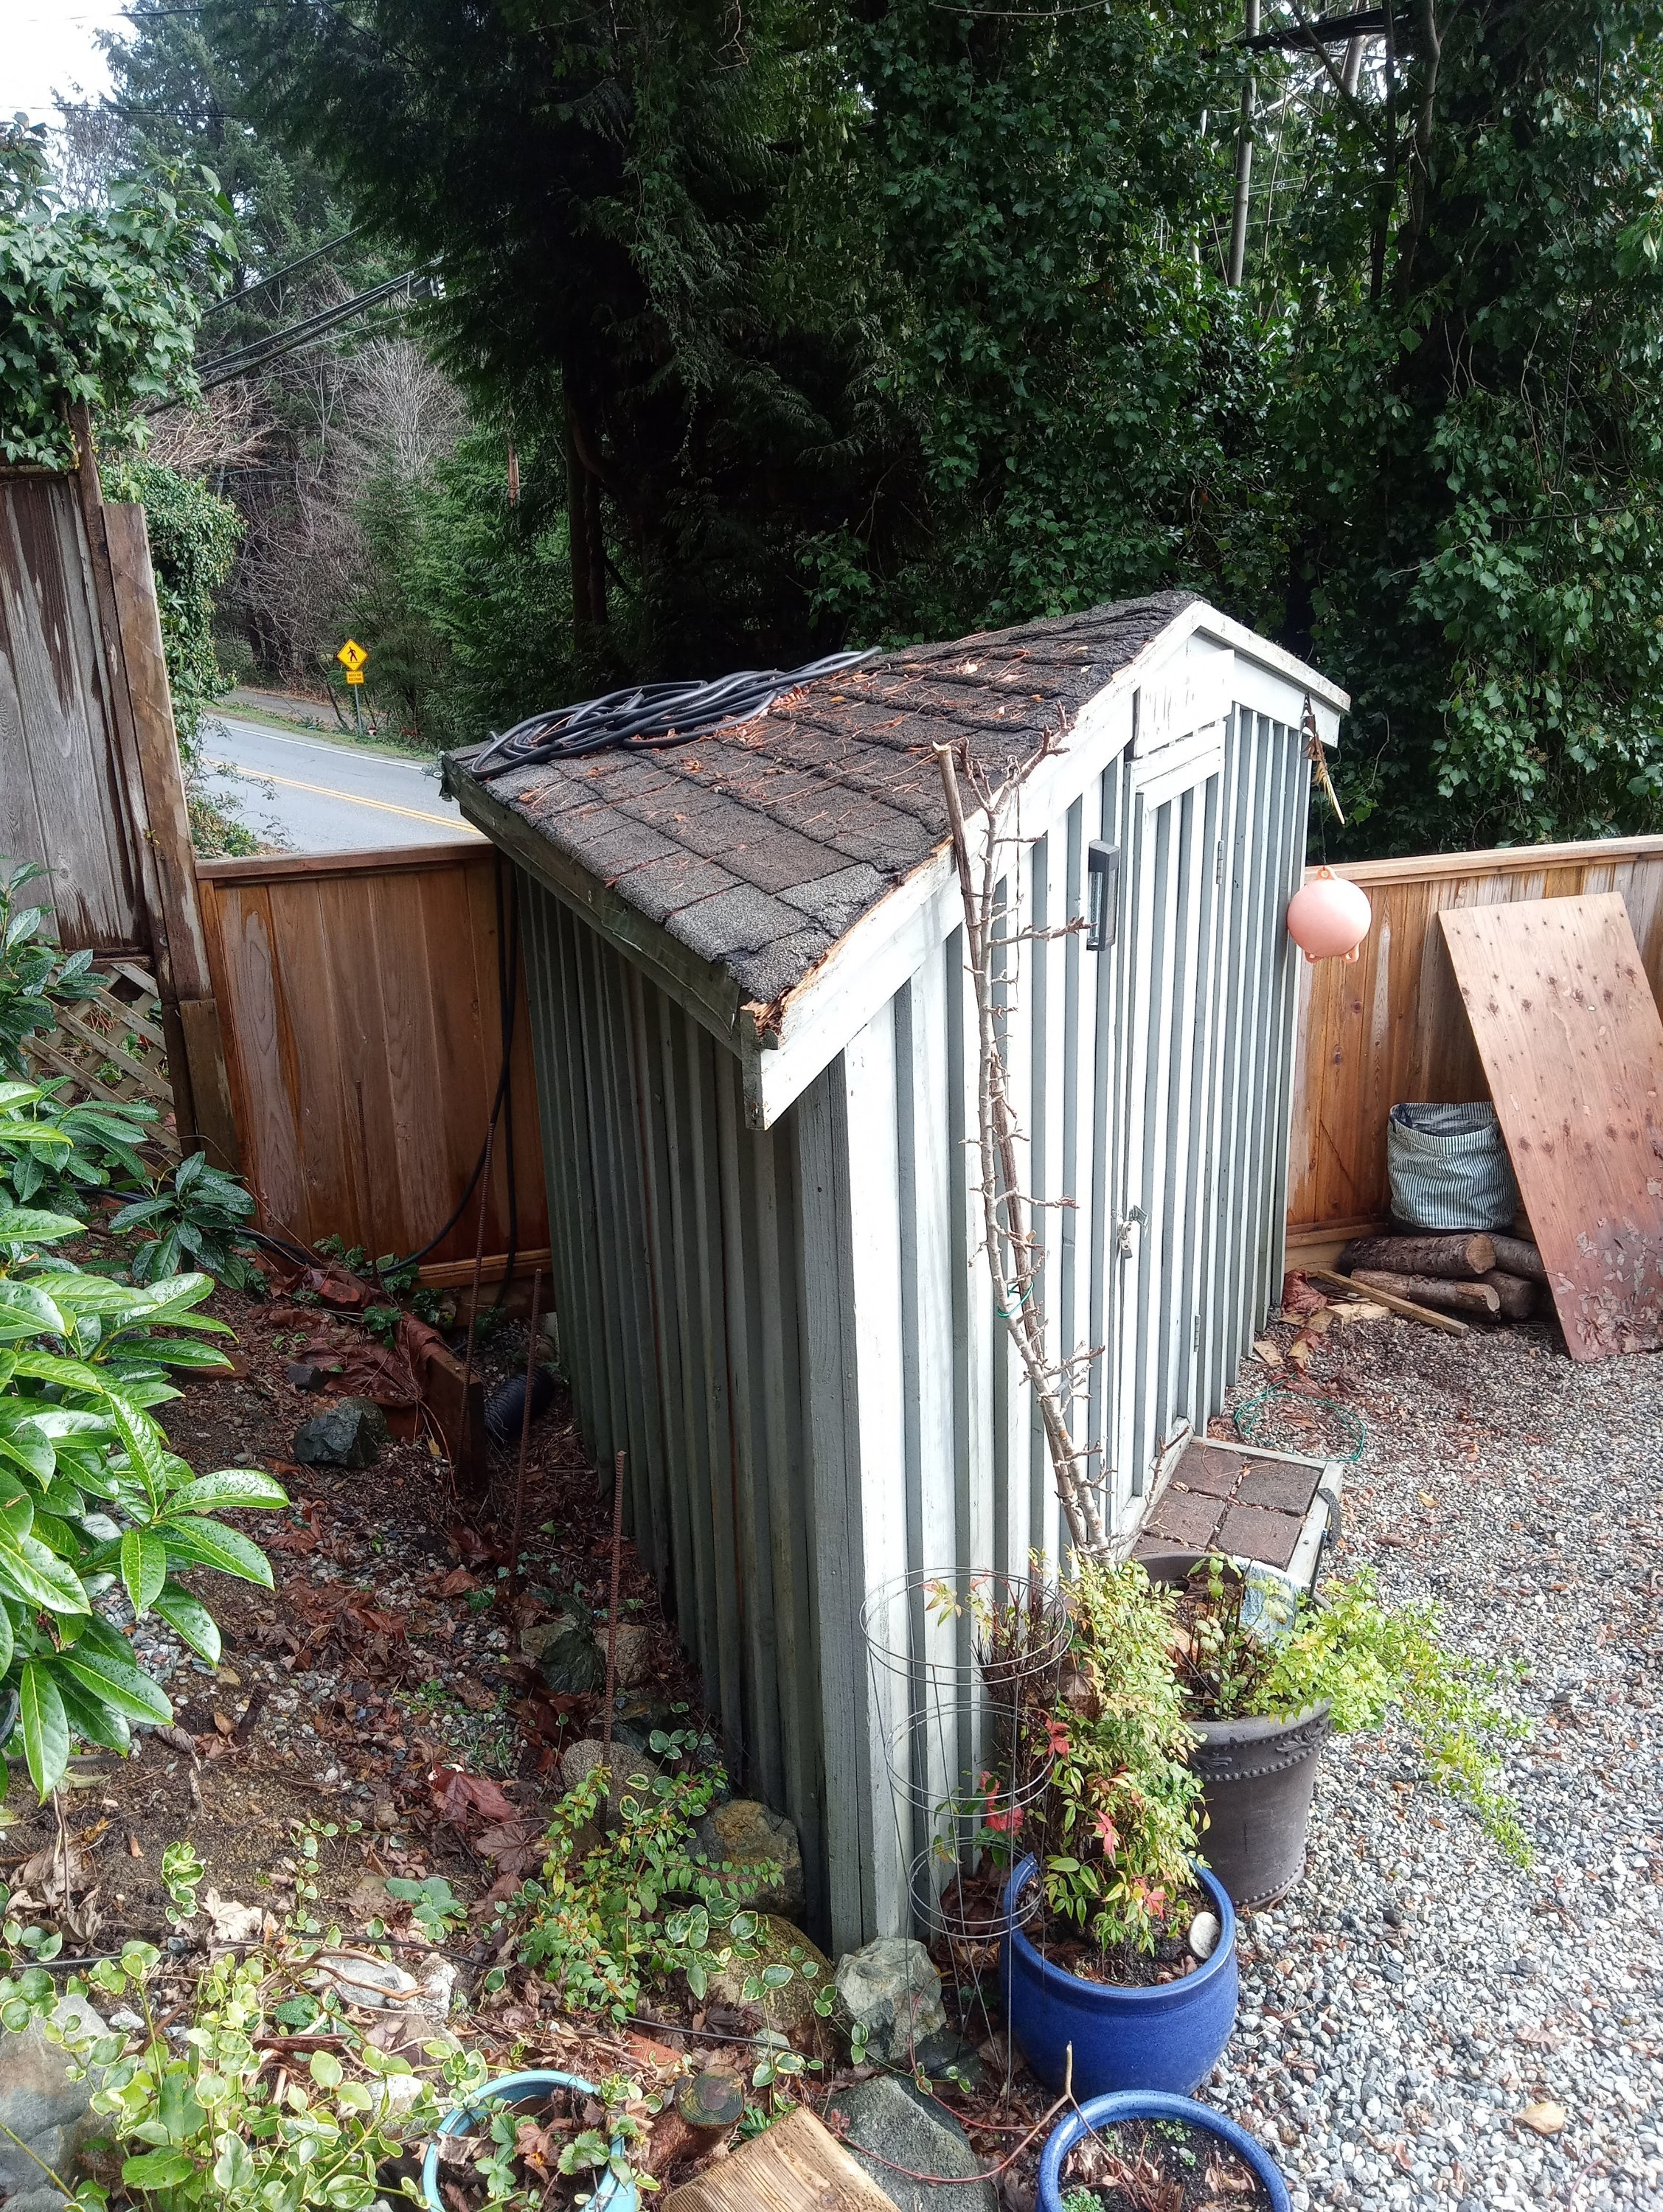
The existing garden shed was badly built, had a low ceiling and was awkwardly triangular.
Quaint but carelessly built by a former shed guy.Not much useable space either.
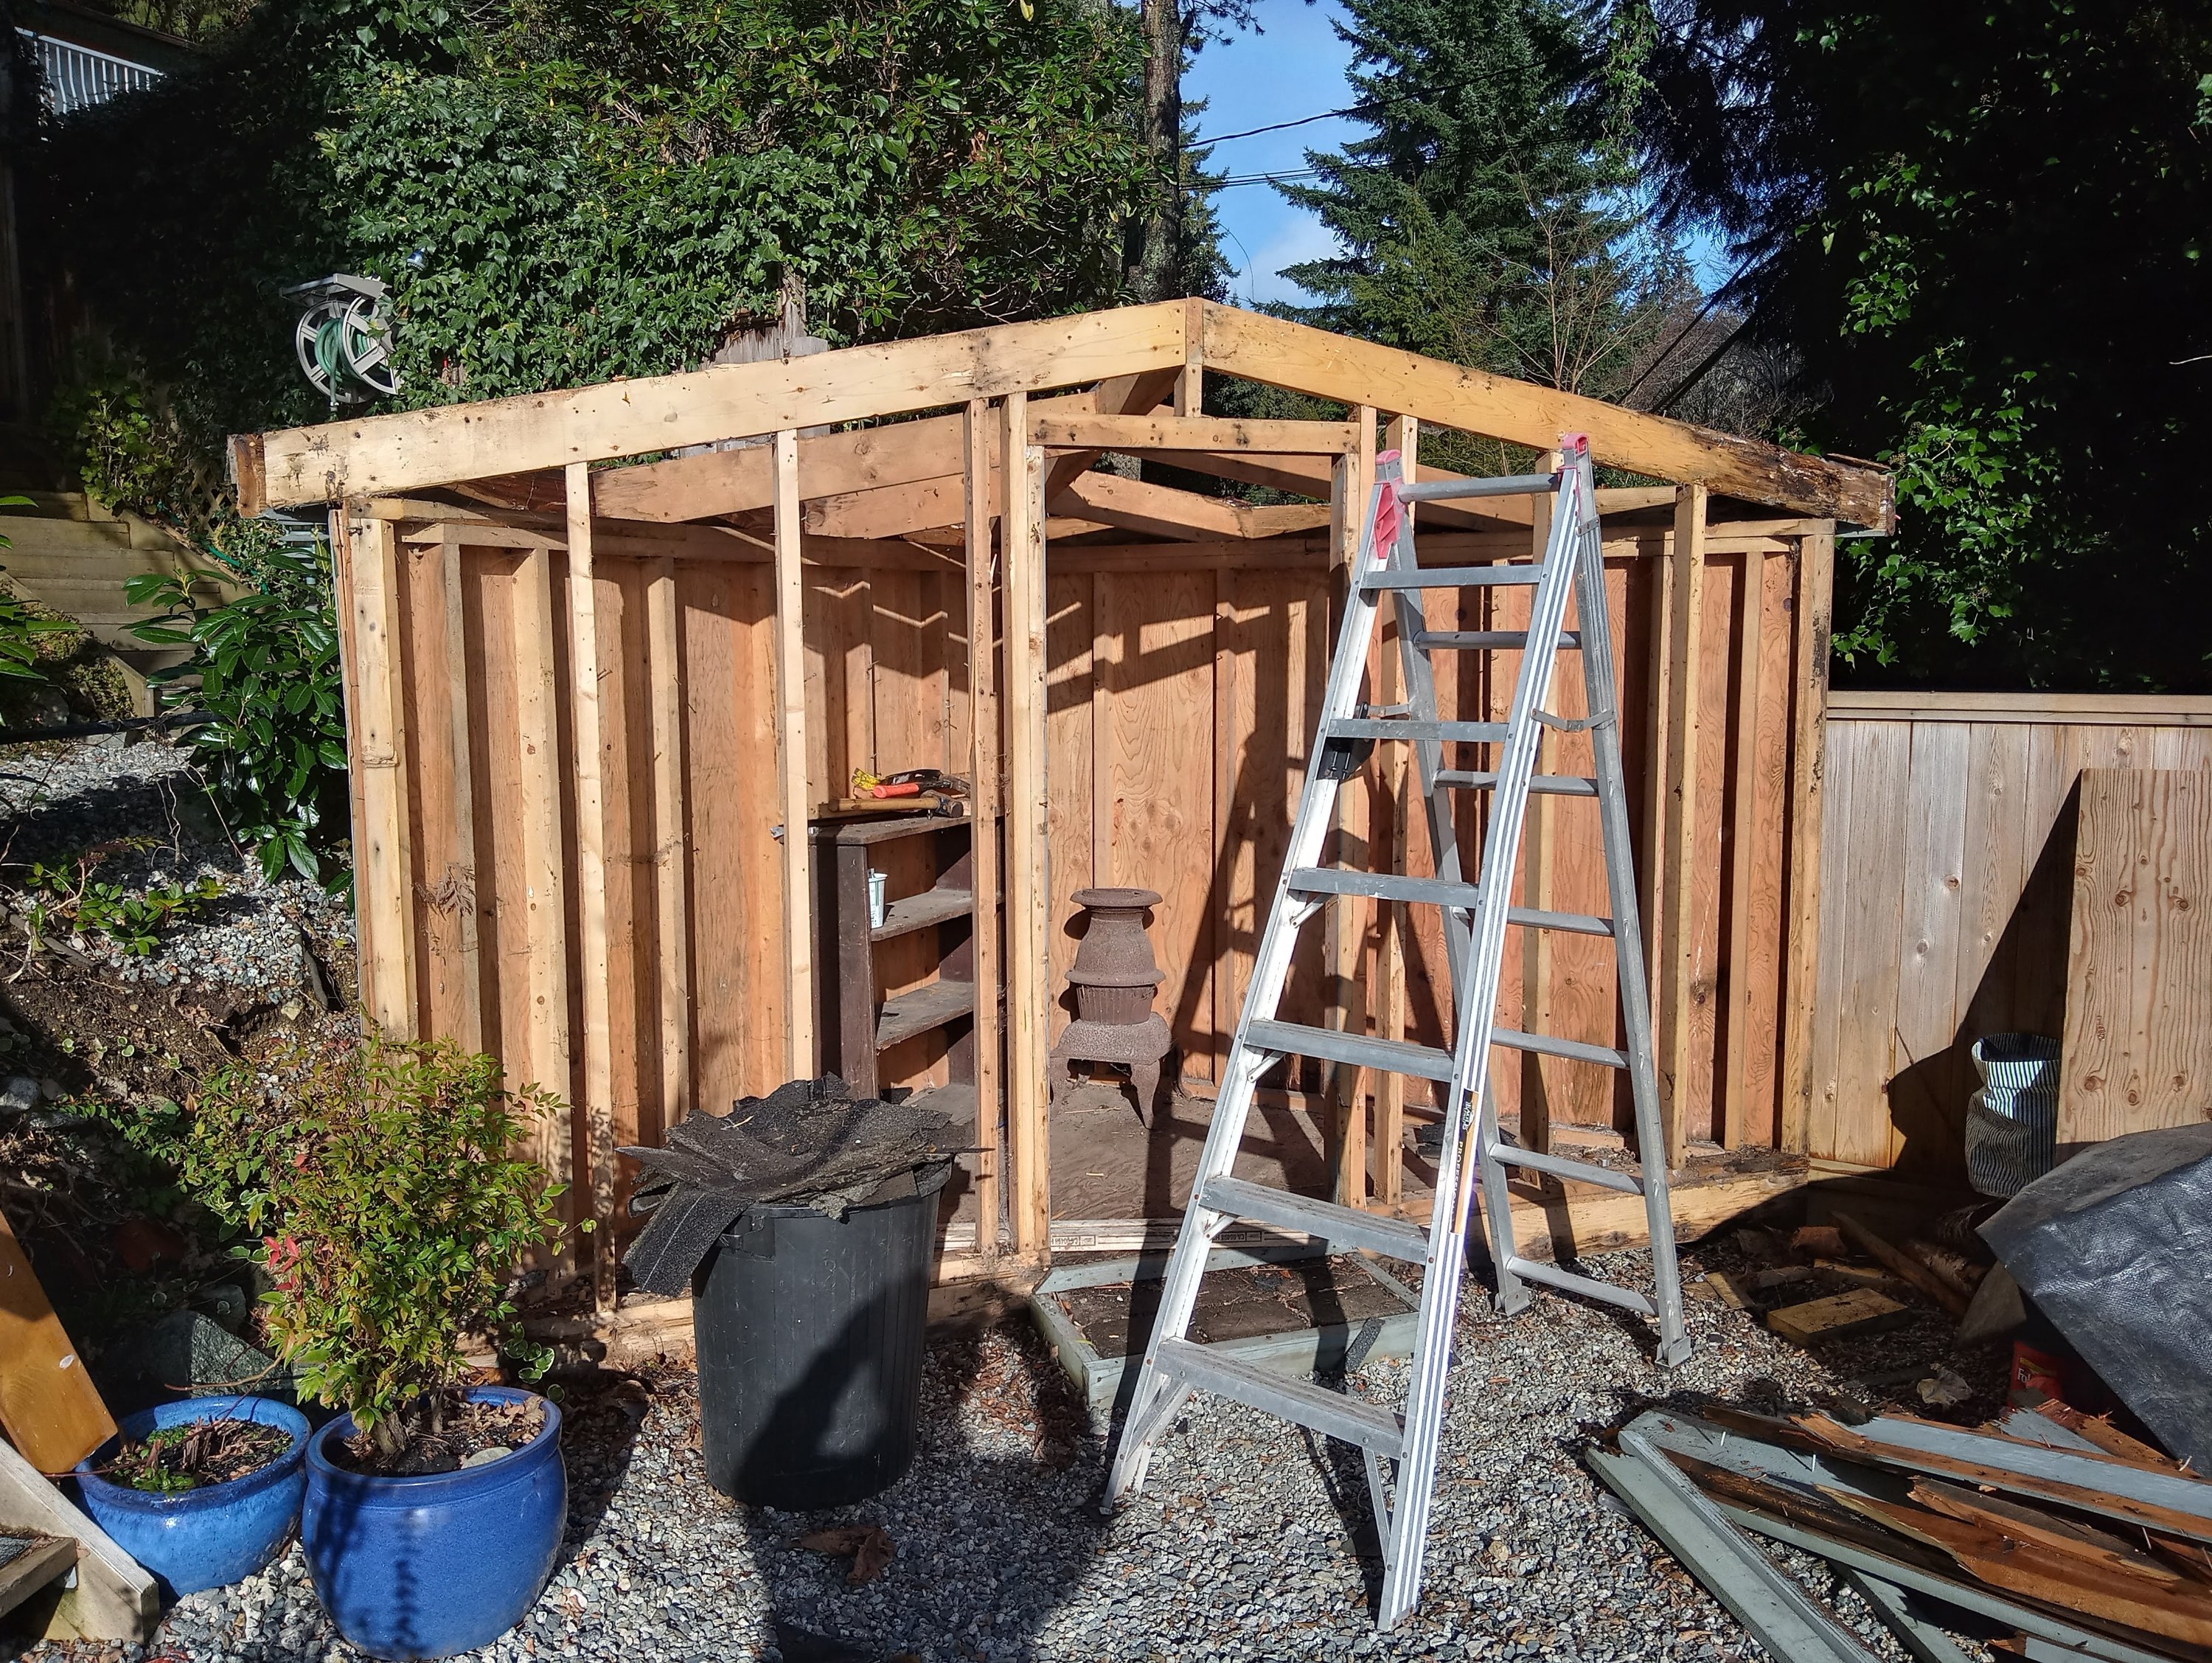
So while I was tending to some family business, my guy had the fun of pulling it all down.
Exposed.Collapsed.And 2 loads hauled to Salish Soils in Sechelt. (Say 3 times fast.)
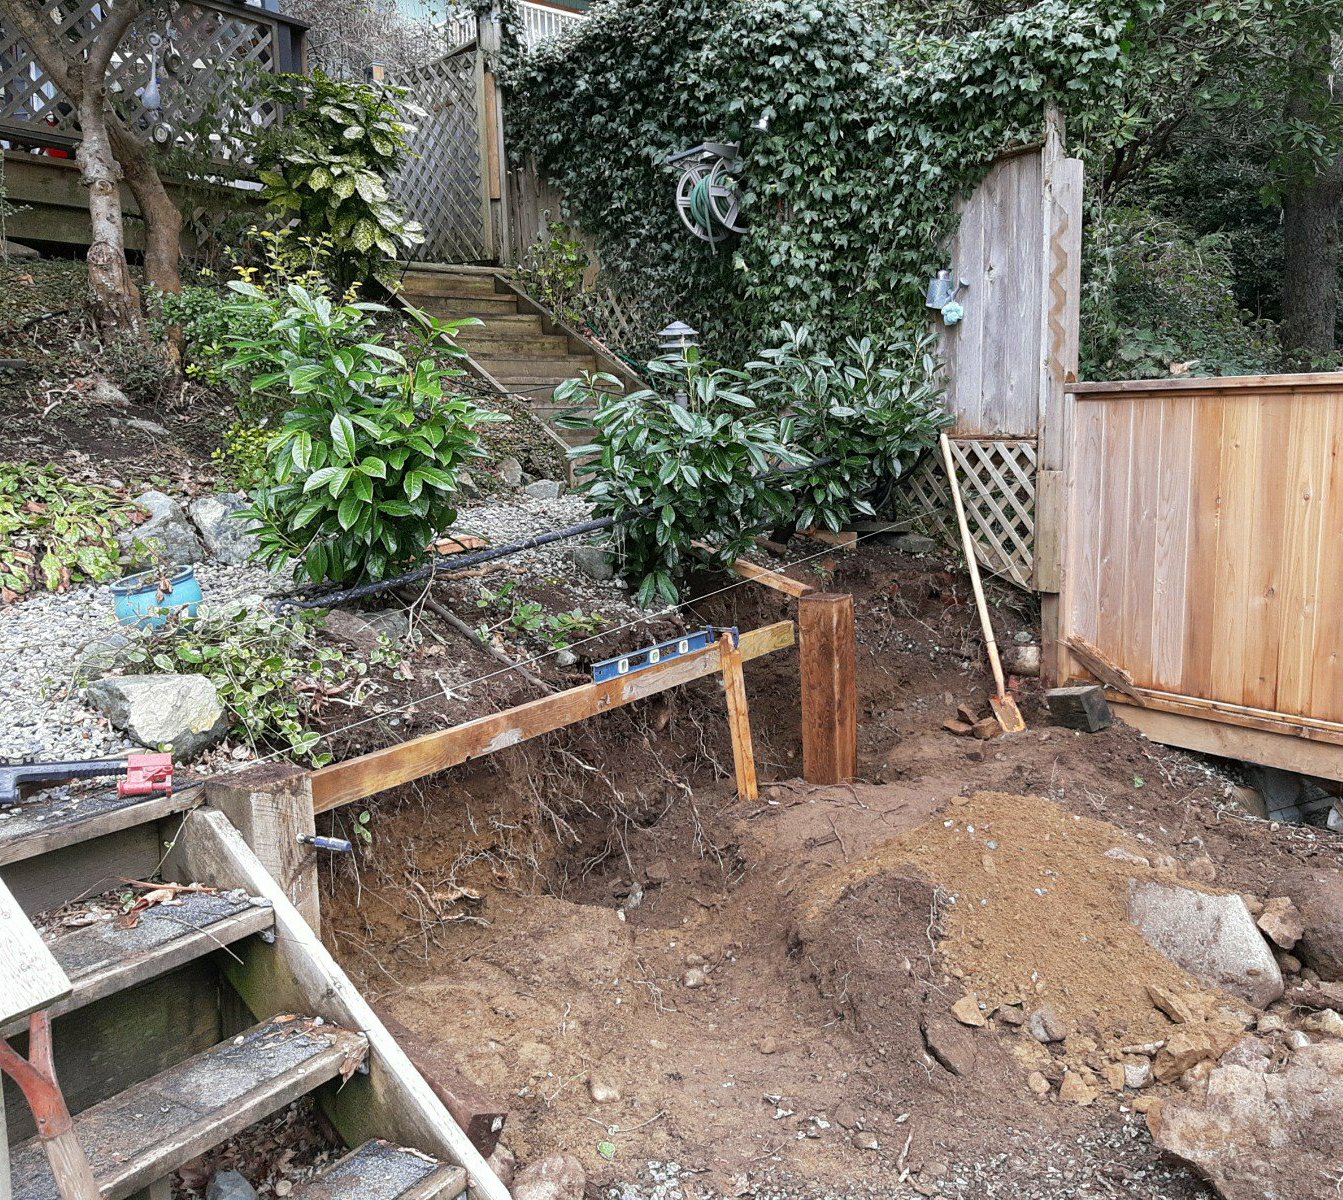
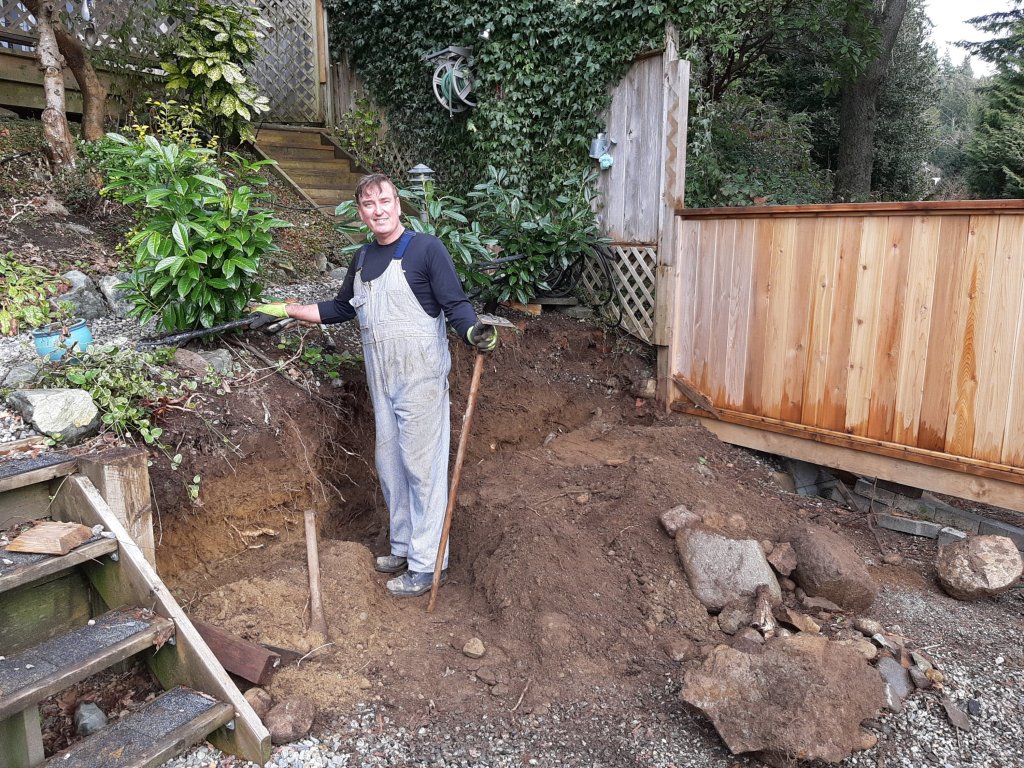
Next step was excavation. Beside the old shed was a rough embankment – the only bit of land in the front of the house not landscaped, in fact. So we fixed this by digging most of it up to gain more room for the shed. And then the embankment needed to be shored up with a retaining wall.
ExcavatingLeveling.Building a retaining wall
But all that dirt had to go somewhere so we built a long, deep new planter behind the wall.
But nothing could be planted in the planter because there were three stocky laurel shrubs there. We compromised by removing 2 of them, using an automobile jack!
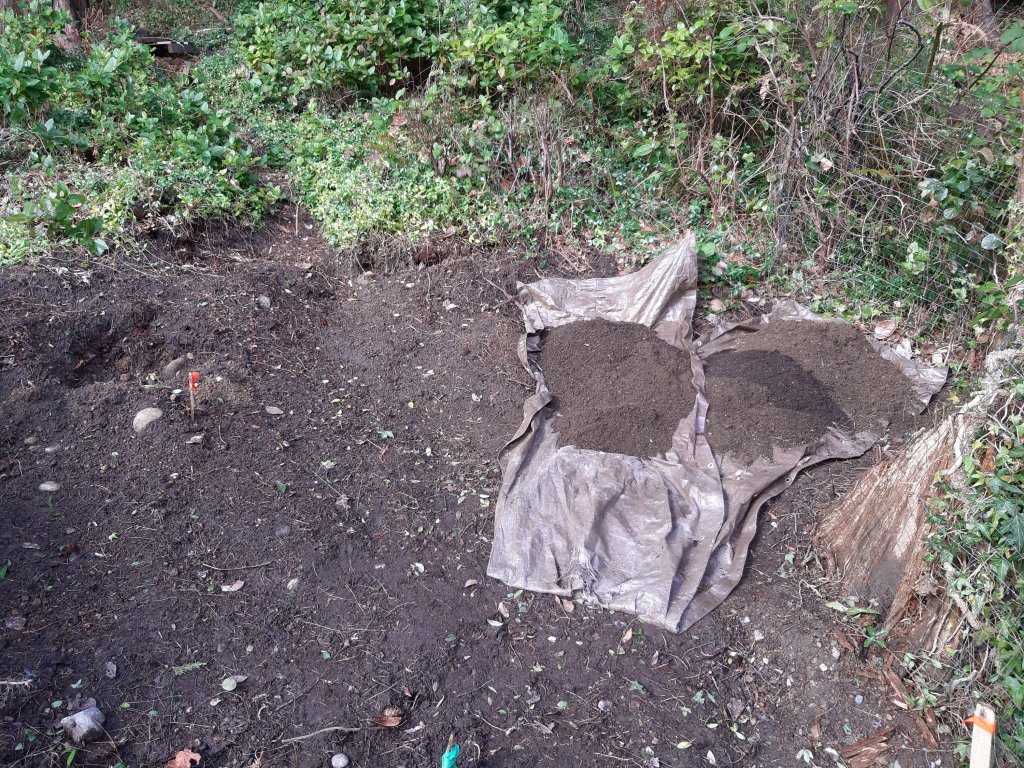
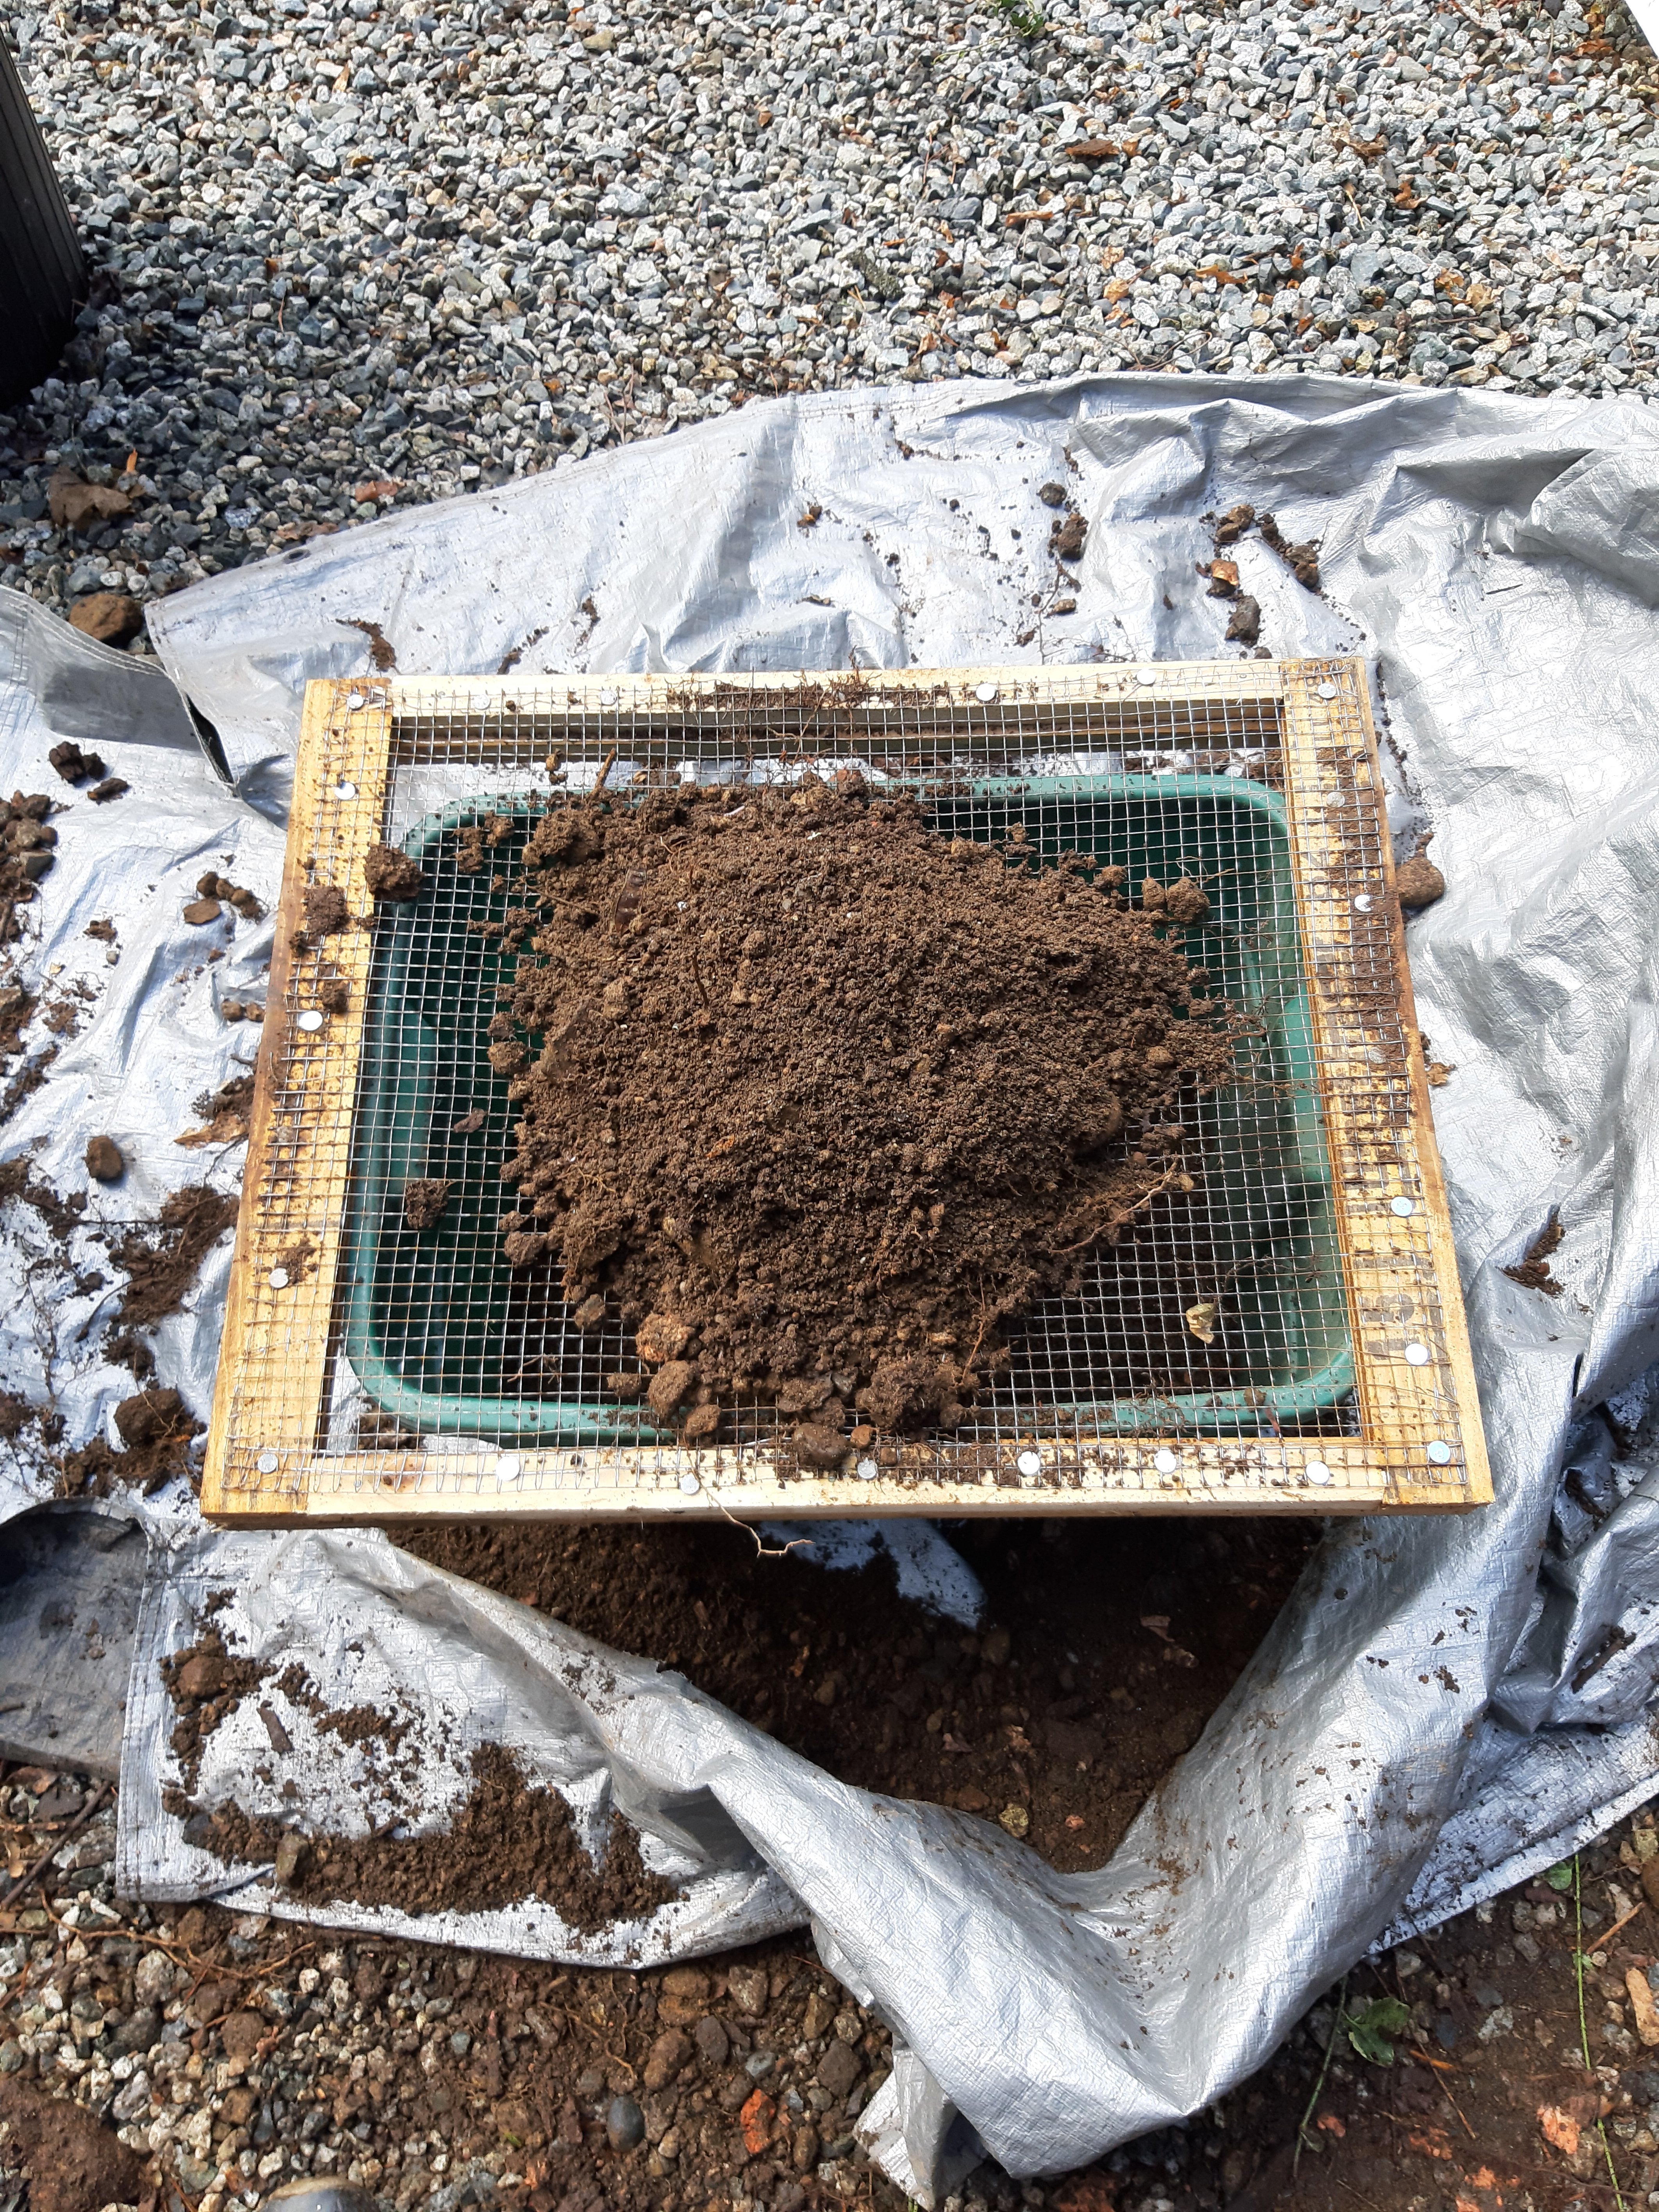
Jacking out the laurels Then we spent a lot of time screening the excavated dirt to put into the planter.So, finally, the planter was filled with dirt (plus peat moss, compost and other soil components. And Rand could lay out the footprint of the new shed. Whew!
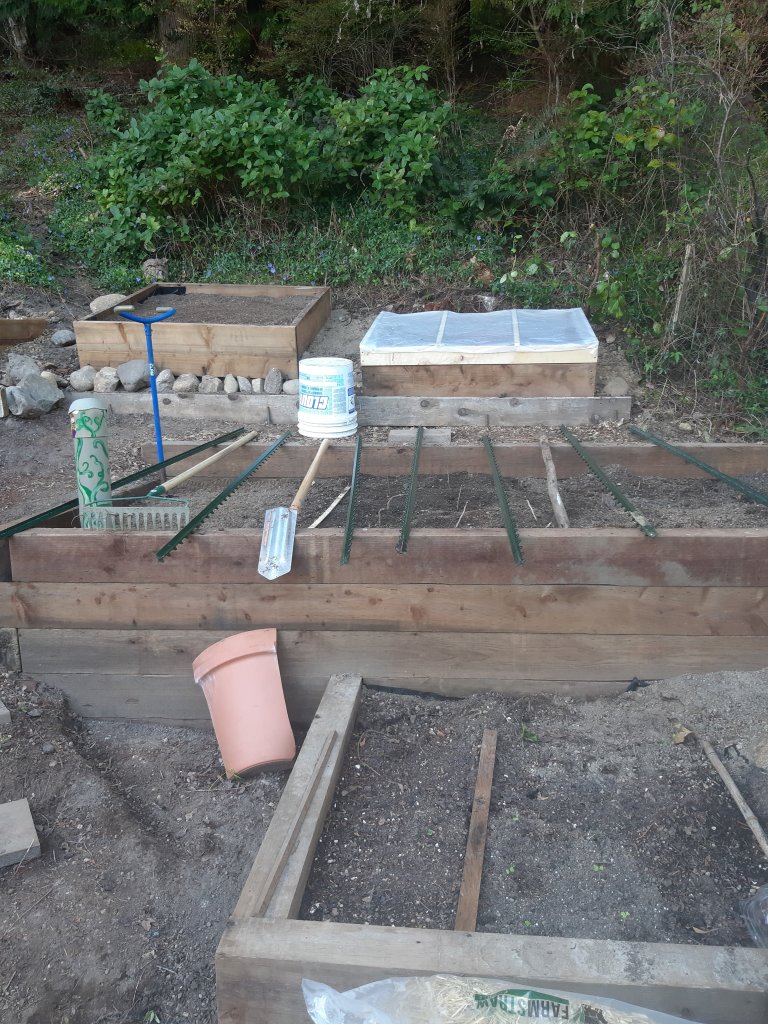
So that is a short version of the Getting Ready to Build a Shed dance we have been doing. Without reference to the hauling of boulders, or the dozens of loose bricks we found, the digging of posts and pouring of concrete, etc, etc.
So now on to the shed right? Nope. More retaining walls. Stay tuned.
We can’t have friends to stay and we dont know when that will change. But I dream of having guests: People to cook for and with, friends whose presence justifies that extra drink that now just makes me feel guilty, and someone new with whom to play board games and cards.
This desire, along with a decision not to rent our place this year to vacationers, was ample motivation to spend a few days improving our guest room.
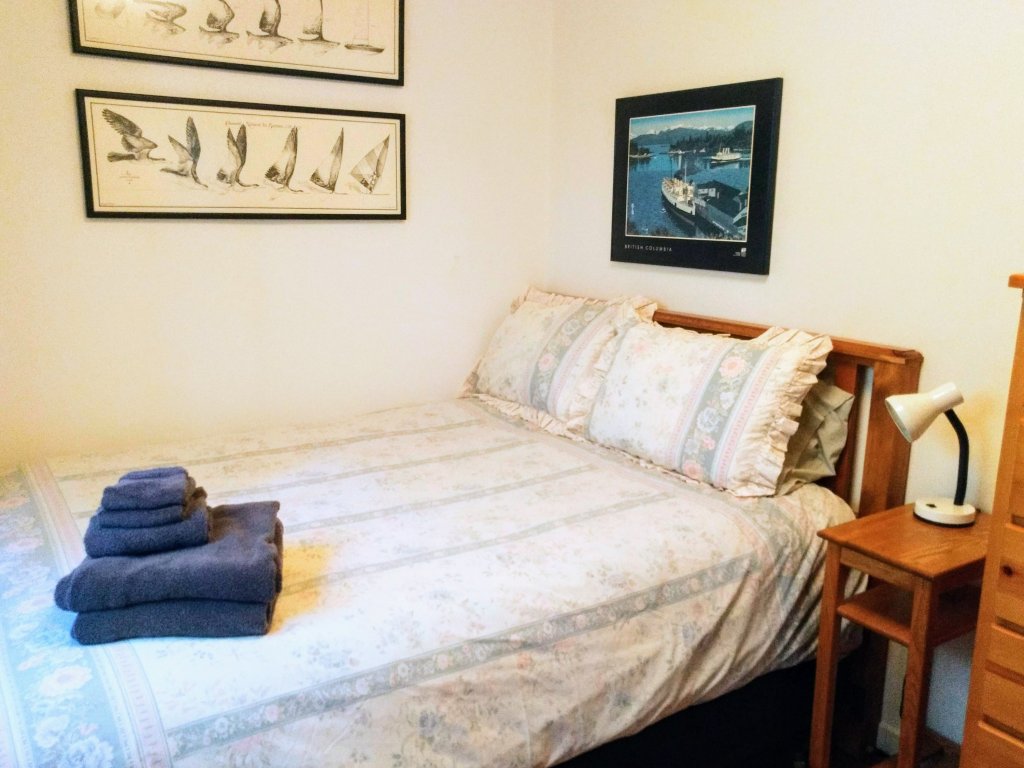
2019 guest room. Someone had to sleep against the wall.
This room – every room in fact – was freshly painted with a matte white when we bought the place in late 2007. So repainting was not an early priority. It has; however, become increasingly desirable over the last few years. And no excuse not to do it right now.
Benjamin Moore has a new, extra durable paint called Scuffex. It’s not outrageously expensive either. I chose a pearl finish as the room is a bit dark and would benefit from a reflective lift. As for colour, as usual I went with my gut, quickly singling out a pale grey white called White Wisp. It isn’t a warm colour, which is what one craves just now, but the cottage is principally a summer spot, so I had to put myself in summer thinking mode.
The paint went on beautifully, and floor, ceiling, 5 panel door and window trim were all given 2 coats of gloss in BM Cloud White.
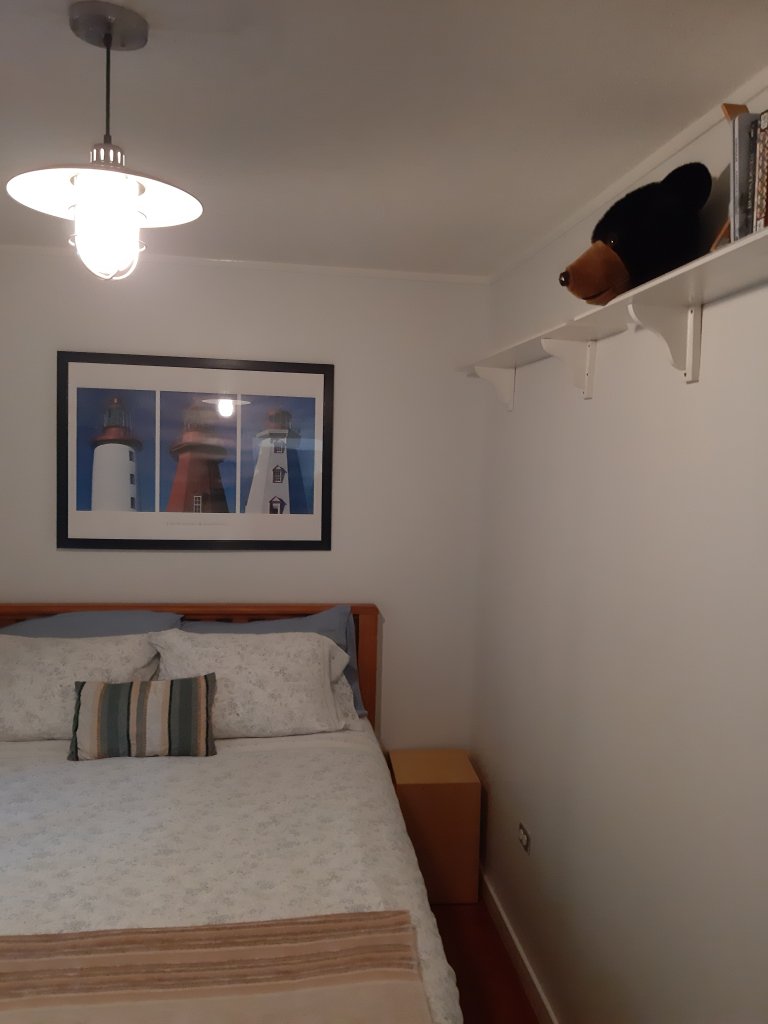
We replaced a cheap ikea ceiling fixture with a lovely nickel fixture that we wrote out of our sales contract when we sold up in Port Moody. I was so glad to find a perfect place for it. We also replaced the non- functioning dimmer switch.
We reoriented the bed so there is (some) room on both sides, then edited and rehung wall decor. We also painted up some found “free” shelves with trim paint and installed them at about 2 metres from the floor, to add a splash of interest and some high storage to an otherwise bare-by-necessity wall.
A shippy light fixture and some free, high shelves are favourite touches.
I washed the duvet and mattress pad, replaced all the pillows and polished the floor.
As usual, there are a few things holding me back from declaring the job fully complete. We are hoping to refinish an old piece of furniture to double as desk and dresser for this tiny room. And the baseboard heater needs to be replaced.
But in general, I am happy everytime I walk by the room and can’t wait to welcome our first guests of 2021. Whenever that becomes possible.
Meanwhile, we use this as Break Out space for our individual activities: puzzles and crafts for me, and music and gaming sessions via Zoom for my partner.
A more inviting space, just waiting for friends.
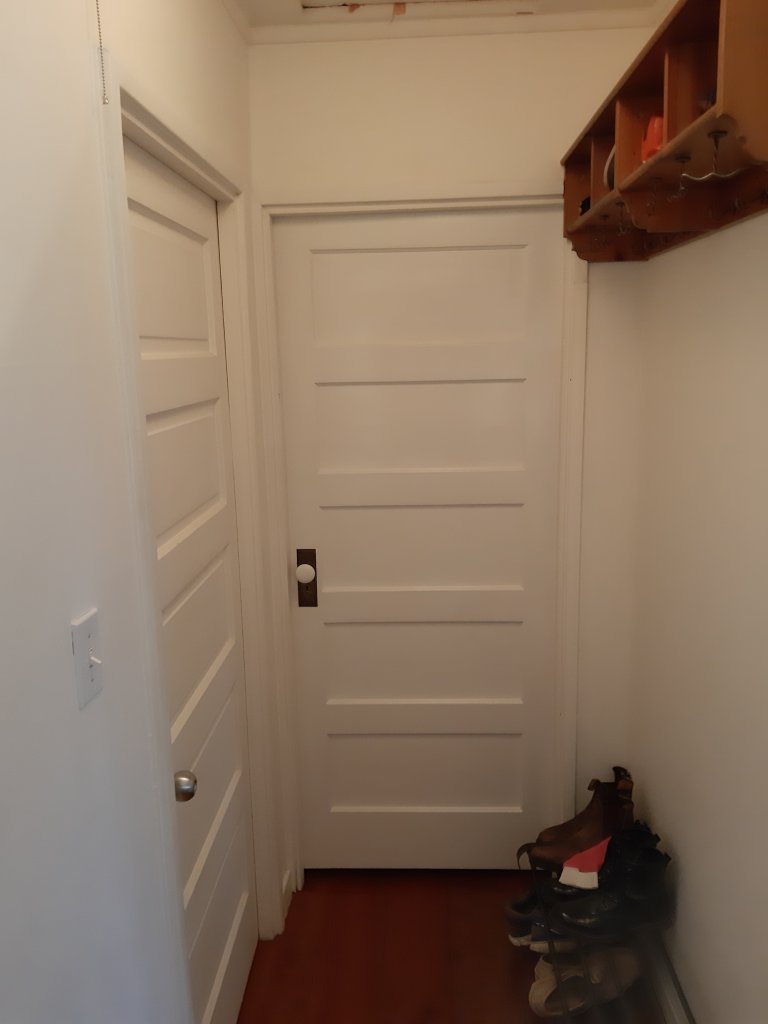
There was about a litre of the grey white paint left, so after a few days rest, I washed, taped and painted the small hallway outside the guest room.
I followed on with the trim and other doors off this hallway. Now I can’t stop. My room next, then the livingroom and eventually, a complete redo of the bathroom.
The hallway before it got a fresh coat of paint.In progress. Lighting is not optimal, but this photo shows the soft grey shade of BM White Wisp as I started to paint the hallway.
There is time, O yes, there is time enough to amuse oneself with aliterations and acronyms. In this case P6 will serve as the yet shorter form for PPPPPP.
More simply, I’m creating a cache of well loved family recipes for my kids (and their cousins if they care to dabble.) Bonus, they are available to me wherever I find myself in years to come.
What will this include: Agne’s Swedish Meatballs, Jean’s Nuts and Bolts, Ginger Sparklers (aka Molasses cookies) and more.
When someone wants a family recipe, I’ll write it down here. Or where possible, snap a picture from my mom’s recipe book and add my preferred changes and comments.
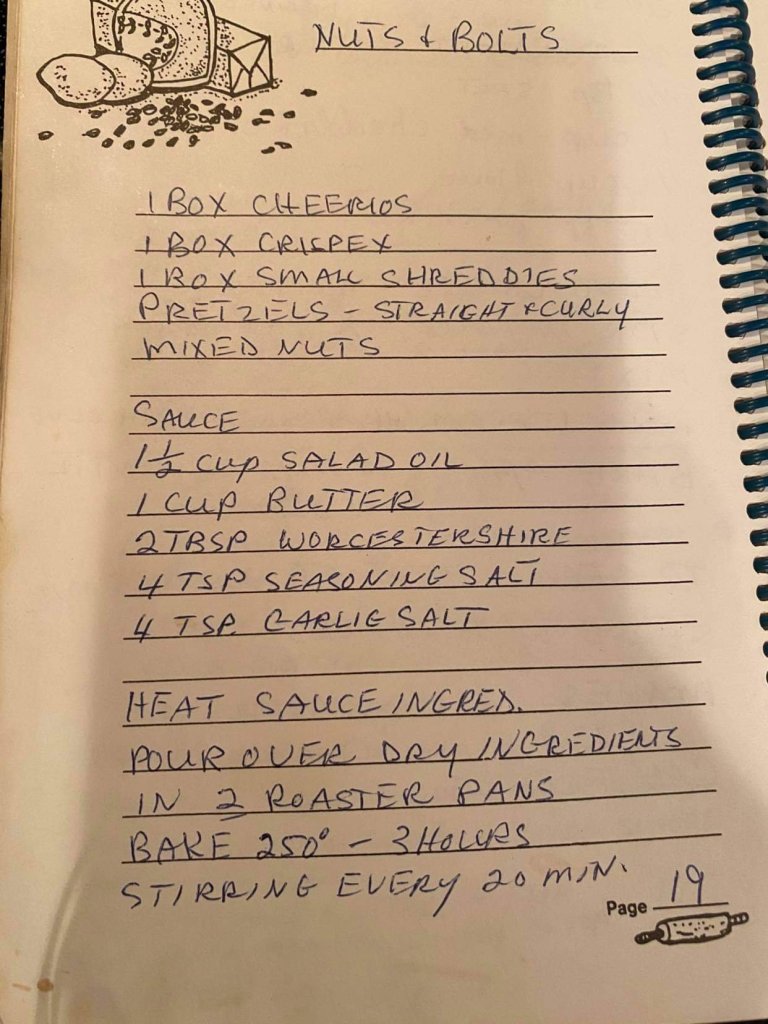
NUTS And BOLTS
The family recipe, apparently originating with my Aunt Jean. But tweaks are necessary!
These Nuts and Bolts are the first thing I make in preparation for Christmas each year. Since they store well in a cool place, I start looking for cereal on sale in late November and often have these made before December 1st.
As noted, this recipe makes 2 roasting pans full or about 4 full 1 gallon ziplock freezer bags.
The first of two roaster pans.
The main tweak for this recipe is to DOUBLE the Worcestershire sauce to a full one quarter (1/4) cup. I believe this is the magic ingredient that turns your heap of cereal from a salty oily mess (prior to baking) into something more than the sum of its parts. But this is entirely up to you.
I also find that half a box of cheerios is plenty. My personal preference is for more shreddies. And I put in about 1 cup mixed nuts and two cups jumbo salted roasted peanuts. I use one bag of pretzel sticks and one of traditional small pretzels.
Store in a cool place, such as your garage, or you will open the bags each time you see them and snack all day.
When the plants flowered and started to wilt it was time to harvest.The no hill method worked well, i didnt need to dig very much and the harvest was about 2 lbs per plant. Not great but not bad either.Not a massive harvest, but very satisfying all the same. There was no evidence of wire worm damage, as was foretold by a worker at the nursery.The potatoes are very flavourful, cook quickly and are beautiful to look at – at least, I think so.
There were almost as many nuggets as there were full sized specimens. I found a wonderful recipe for these. Quick, simple and delicious:
GRILLED MARINATED BABY POTATOES
Scrub and then fully cook nugget potatoes in salted water. Do not overcook. Plunge in cold water when done to stop cooking. Halve each potato after cooking, not before.
Mix 1/4 cup mayonnaise and 1/4 cup dijon mustard in a bowl large enough to hold the potatoes. Add 3 crushed garlic cloves, 1/2 tsp salt, pepper to taste and whisk it into a creamy sauce. Sprinkle in some fresh thyme or rosemary if you have it.
Add cooled cooked potatoes to bowl, stir gently to coat and then cover and refridgerate until 1 hour before serving. Allow them to warm a bit at room temperature. When your meat comes off the grill to rest, have these ready to go right on!
To finish: Place them on a well sprayed hot grill, and do not turn until they are beginning to char. Turn each piece once only and grill quickly. Remove to a serving platter and watch them disappear.
In between bigger projects, we spent half a morning making some fast improvements:
Swapped out last years worn and faded-to-pink flag with a fresh one from the dollar store. $2.50Set up a new laundry line in a sunnier spot. PVC coated cable, 2 clamps, 1 turnbuckle and some hooks $21.Installed a magnetic mesh screen on our seldom used “front” door for better air flow.Installs in minutes and the only tool required is scissors. Great value at $16These herb (and cucumber) planters looked messy sitting directly on the deck and attracted a lot of debris, woodbugs, etc.Getting them up on wheeled planter caddies looks neater and the deck stays cleaner. $27 for 3.
Its so interesting to me to look at photos I have taken of the garden over the past few months, so posting some here to make them easily accessible. The first three were taken in the exact same spot. This is a flower garden that has tomato, rhubarb and strawberries co-planted.
AprilMayJune
And then there is my lower veg garden that was previously full of gladiolus and some shrubs.
Snap peas left. Beets in the middle and carrots to the right. Back row is sugar baby melon territory and a newly planted asparagus patch that should bear next year.Plus bush beans front and centre. Melons doing nothing weeks later.Snow peas and snap peas starting to flower. Melons still nothing. Its too cool this June and they are only getting about 6 hours sun in this location when there is sun at all. So next year either no melons or find a better spot. Snuck a second carrot planting into the barren melon patch as consolationNeighbours Derek and Natalie gave me some sunflowers!